Thursday 30 August 2018

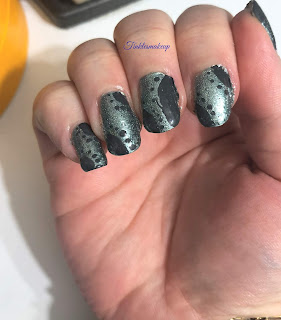
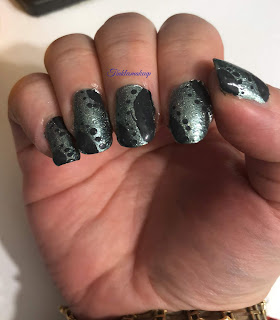
Tha Addams Family nail art


hi fairies,
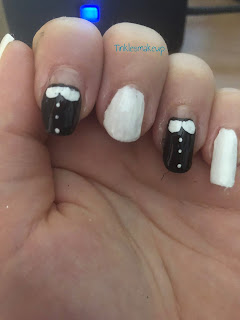
this nail art is inspired by one of my favorite tv series, the Addams Family! Who doesn’t love it, I mean it’s impossible not to! The characters are iconic and they never cease to amaze young generations, it’s such a unique tv series and so well made!
I painted my nails with a white nail polish apart from my index and ring finger, where I used one of those stickers for French mani to get a neat line, but I went for a moon mani and I painted the rest of the nails with black. On these fingers I painted the white peter pan collar Wednesday wears, and I added white buttons.   that was it, I hope you like it!

addams_family_nail_art

addams_family_nail_art


Italian version:

Ciao fatine,
Questa nail art si ispira a una delle mie serie tv preferite, la Famiglia Addams! Penso che piacciano a tutti, voglio dire, è impossibile che non piacciano! I personaggi sono iconici e continuano ad affascinare le nuove generazione, è una serie tv unica e veramente ben fatta!
Ho usato uno smalto bianco su tutte le unghie tranne che sull’indice che sull’anulare, dove ho usato uno di quegli adesivi per la french mani per ottenere una linea precisa, ma ho realizzato una manicure con le lunette scoperte e ho usato uno smalto nero sul resto dell’unghia. Su queste due dita ho disegnato il colletto stondato bianco che indossa Mercoledì, e ho aggiunto dei bottoni bianchi. è tutto, spero vi piaccia!

addams_family_nail_art

addams_family_nail_art


Products used:

essie nail polish ridge filling base coat

kiko nail care fast & shiny top coat

kiko nail polish power pro no 101

kiko nail polish power pro no 01

Wednesday 29 August 2018

eye makeup look: sparkly ice


Hi fairies,
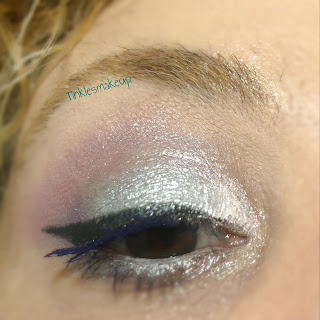
I love using grey for my makeup, I think it’s very classy and it suits almost everybody; it’s not easy to find good grey eyeshadows though, especially nowadays when warm shades are so trendy but luckily I have some in stock!
I started by applying a matte mauve eyeshadow in my crease with a large fluffy brush and I defused it very well; in my inner corner I used a white sparkly pigment with iridescent microglitter in it, in the middle of my lid I used a shimmery silver pigment and in the outer corner I applied a sparkly grey to give more depth to the look. I brought this last shade in the crease but I didn’t blend it upward too much as I wanted it to be quite defined. I completed the look with a winged liner and some mascara, and that was it, I hope you like it!

eye_makeup_look_sparkly_ice

eye_makeup_look_sparkly_ice

eye_makeup_look_sparkly_ice


Italian version:

Ciao fatine,
Mi piace molto usare il grigio per realizzare il mio makeup, penso sia molto elegante e che stia bene praticamente a tutti; non è facile, però, trovare dei validi ombretti grigi, specialmente adesso che le tonalità calde la fanno da padrone ma, fortunatamente, ne ho qualcuno in stock!
Ho cominciato applicando un ombretto opaco color malva nella piega usando un pennello largo da sfumatura e l’ho sfumato molto bene; nell’angolo interno dell’occhio ho usato un pigmento luminoso bianco con all’interno micro glitter iridescenti, al centro della palpebra mobile ho usato un pigmento luminoso argentato e, nell’angolo esterno, ho applicato un grigio luminoso per dare più profondità allo sguardo. Ho portato l’ultimo colore nella piega senza, però, sfumarlo troppo verso l’alto perché volevo che fosse piuttosto definita. Ho completato il look con una riga di eyeliner e del mascara, ed è tutto, spero vi piaccia!

eye_makeup_look_sparkly_ice

eye_makeup_look_sparkly_ice

eye_makeup_look_sparkly_ice

Products used:

nyx proof it! Eye primer

nyx jumbo eye pencil no 604 in milk

colourpop powder shadow in secret

colourpop powder shadow in soft core

colourpop shock shadow in cherries jubilee

about face loose pigment in misty maiden

pupa loose pigment no 001

kiko smart eyeshadow no 10

makeup revolution hypocrisy eyeliner

kiko fine line pen liner

la girl booming lashes mascara

Monday 27 August 2018

One product review zoeva winter strobe spectrum palette


Hi fairies,
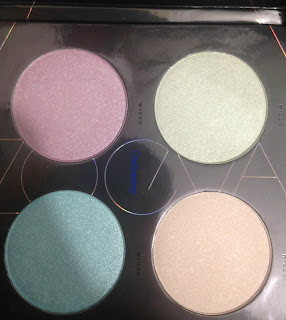
I know we’re in summer but I wanted to talk about one of my favorite highlighter palette, the zoeva winter strobe spectrum palette, which is totally underrated in my opinion!

Let’s see how it’s described: As water turns into ice in the sky and falls to the earth as glistening snow crystals, the ZOEVA Winter Strobe Spectrum Palette wafts an iridescent, cool breeze on the face, leaving the skin with a translucent, frosted finish. With shades ranging from glacial nacre, pale rose and icy lilac to polar blue, the velvety soft and remarkably pigmented formula provides a brilliant luminosity with an incredible shimmer effect – for a fascinating, frosted glow, as if lit from within. Price 24.50 €.


zoeva_winter_spectrum_palette_review

What I like: it’s a cardboard palette with four highlighters, all of them in cold shades. There are other three palettes in the range, one for each season. When I saw it I immediately fell in love with it, there’s a pale blue, a frosty lilac, a baby pink and a light champagne, all of them have a frosty finish and they have no glitters in them. They are pigmented, velvety and with basically no fall out. They are buildable, they aren’t patchy even when  you apply two or three layers on your face. They can be used as eyeshadows as well, I especially love the pale blue one as it’s one of the colors I use the most. They last 5-6 hours without fading away.

What I don’t like: these shades aren’t exactly everybody’s cup of tea, I know that, and let’s not forget they will look ashy on warm and dark skin tones. I have to apply them with a very light hand, especially the blue one, because it might look like a bruise if I apply too much of it.

My verdict: definitely a good alternative to most expensive and popular palettes, you’ll get four good quality highlighters at a fair price!
zoeva_winter_spectrum_palette_review


Italian version:

Ciao fatine,
So che siamo in estate, ma oggi voglio parlarvi di una delle mie palette di illuminanti preferita, la zoeva winter strobe spectrum che, secondo me, viene decisamente sottovalutata!
Vediamo come viene descritta: La palette Winter Strobe Spectrum dona alla pelle un finish fresco e luminoso.
Per quale tipo di make-up?
La texture vellutata e la formulazione dei pigmenti conferiscono ad ogni tonalità una sfumatura perlata che va dal rosa pallido al blu polare, passando per il lilla perlato.
Un'irresistibile brillantezza dai riflessi perlati-metallizzati. Prezzo 24.50 €.
zoeva_winter_spectrum_palette_review

Cosa mi piace: è una palette in cartone pressato che contiene quattro illuminanti, tutti in tonalità fredde. Sono disponibili altre tre palette nella gamma, una per ogni stagione. Quando l’ho vista me ne sono immediatamente innamorata, c’è un celeste chiaro, un lavanda metallico, uno champagne chiaro e un rosa pallido, tutti dalla finitura perlata senza glitter al loro interno. Sono pigmentati, vellutati e non sono assolutamente farinosi. Sono modulabili, non creano macchie nemmeno quando ne si applicano due o tre strati sul viso. Possono essere anche usati come ombretti, a me piace in particolare quello celeste chiaro, dato che è uno dei colori che uso più spesso. Durano circa 5-6 ore senza sbiadire.

Cosa non mi piace: sono tonalità che non a tutti possono piacere, me ne rendo conto, e inoltre non va dimenticato che risulteranno grigiastri su carnagioni dal sottotono caldo e olivastre. Devo applicarli con molta cautela, specialmente quello celeste, altrimenti sembra di avere un livido sul viso.

zoeva_winter_spectrum_palette_review

Il mio verdetto: la ritengo una valida alternativa a palette più costose e popolari, acquisterete quattro illuminanti di buona qualità ad un prezzo conveniente!


Friday 10 August 2018

Eye makeup look rose bud


Hi fairies,
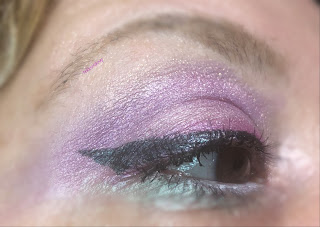
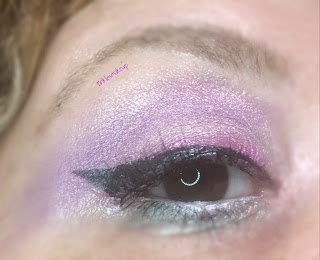
I got inspired by roses’ colors for this look, it’s soft and romantic and I think it looks great in spring and summer, don’t you?
I used a pink pigment with blue undertones and silver microglitter in it and I applied it all over my lid, stopping just below my crease; with a blending brush I blended the edges and I added some more pigment while I brought it up into my crease. In the outer corner of my eyes I applied a fuchsia with blue undertones just to give more depth to the look. As my browbone highlighter I used a matte cream eyeshadow with a pink hue and in my lower lashline I smoked out a moss green eyeshadow. I completed the look with a winged liner and some mascara, and that was it, I hope you like it!

rose_bud_eye_makeup_look

rose_bud_eye_makeup_look

rose_bud_eye_makeup_look


Italian version:

Ciao fatine,
Mi sono ispirata ai colori delle rose per questo look, è romantic e delicato e , a mio parere, è l’ideale in primavera e in estate, non trovate anche voi?
Ho usato un pigmento rosa dal sottotono blu e microglitter argentati e l’ho applicato sulla palpebra mobile, fermandomi appena al di sotto della piega dell’occhio; con un pennello da sfumatura ho sfumato i contorni e ho aggiunto del pigmento mentre lo portavo in alto, nella piega. Nell’angolo esterno dell’occhio ho applicato un ombretto fucsia con sottotono blu per dare profondità allo sguardo. Ho usato un ombretto opaco color crema con un leggero riflesso rosato come illuminante dell’arcata sopraccigliare, e nella rima inferiore dell’occhio ho sfumato un ombretto verde prato. Ho completato il look con una riga di eyeliner e del mascara, ed è tutto, spero vi piaccia!

rose_bud_eye_makeup_look

rose_bud_eye_makeup_look

rose_bud_eye_makeup_look

Products used:

nyx cosmetics eyeshadow primer proof it!

Nyx cosmetics jumbo eye pencil no 604 in milk

Fyrinnae loose pigment in titania

Fyrinnae loose pigment in meerkat

Obsessive compulsive cosmetics loose pigment in atmosphere

Inglot mono eyeshadow in lilac satin

Makeup revolution hypocrite eye pencil in white

Kiko cosmetics super color liquid liner no 104

La girl booming lashes mascara

Thursday 9 August 2018

Cute flowers nail art


Hi fairies,
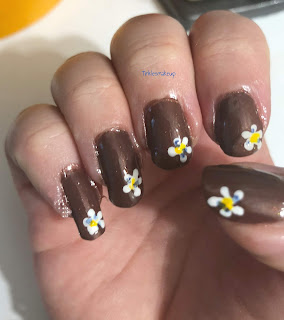
Flowers are so summery and easy to do, there are so many ways to draw them and they always look good no matter what! Today I’ll show you how to paint flower using just a toothpick! I used white to paint the flower but you can use any color of your choice, and I decided to place it on one side of my nail. I simply placed five white dots arranged in a circle shape and, before the nail polish got dry I dragged the color towards the middle of the five dots, and I added a yellow dot in the middle of the flower. With black nail polish I made three dots around the yellow dot and with green nail polish I painted some green stripes all around it, and that was it, I hope you like it!


cute_flowers_nail_art

Italian version:

Ciao fatine,
I fiori sono molto estivi e facili da fare, ci sono tanti modi di disegnarli e fanno sempre una bella figura! Oggi vi mostro come disegnare un fiore usando solo uno stuzzicadenti! Ho usato del colore bianco per dipingere il fiore ma voi potete scegliere qualsiasi altro colore, e deciso di posizionarlo su un lato dell’unghia. Ho semplicemente disegnato cinque pois bianchi disposti a forma di cerchio e, prima che lo smalto si asciugasse ho trascinato il colore verso il centro dei cinque pois, e ho aggiunto un pois giallo al centro del fiore. Con dello smalto nero ho aggiunto tre pois neri intorno a quello giallo e con dello smalto verde ho aggiunto delle linee tutt’intorno al fiore, ed è tutto, spero vi piaccia!

cute_flowers_nail_art

Products used:

essie ridge filler base coat

kiko nail care gel look top coat

kiko nail polish no 375

Americana acrylic paint in white

cute_flowers_nail_art
Add caption


Wednesday 8 August 2018

One product review: the ordinary lactic acid


Hi fairies,
The ordinary is one of the brand most talked about recently, it’s very cheap and there are so many interesting products to try out so I understand the hype, and of course I’ve bought a fair amount of products and I’ve been trying them little by little.

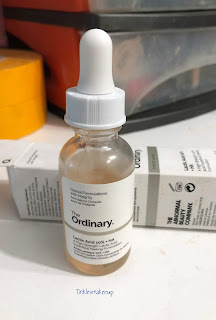
the_ordinary_lactic_acid_review
Today we’ll talk about lactic acid and, first of all, let’s see how it’s described: Lactic Acid is an alpha hydroxy acid that exfoliates the skin. This 10% formulation offers mild exfoliation and is supported with a purified Tasmanian pepperberry known to reduce signs of inflammation and sensitivity that is often associated with exfoliation. A milder 5% formula is available.

This formula contains a studied Tasmanian Pepperberry derivative to help reduce irritation associated with acid use. This derivative is of plant origin and varies in colour seasonally and this colour variation may be apparent in the formula from time to time.


Contraindications: Lactic Acid should not be used on sensitive, peeling or compromised skin. Please refer to additional sun protection note and other warnings in provided Directions.

This pH of this formula is approximately 3.8. Lactic Acid has a pKa of 3.8 and pKa is the most important aspect to consider in formulating with acids. pKa implies acid availability. When pKa is close to pH, there is an ideal balance between salt and acidity, maximizing effectiveness of the acid and reducing irritation. Higher pH numbers in such a case would increase salt which counter-intuitively would make the formula even more irritating than if the formula was more acidic.

Note: While Lactic Acid can result in quick visible benefits, we generally suggest indirect forms of skin exfoliation in favour of direct forms such as this formula due to potential inflammation and sensitivity associated with acids. Please refer to 
NIOD's Non-Acid Acid Precursor for such a reference. 
I apply it in the evening, it comes with a dropper that allows to pick the right amount of product out, it’s liquid just like water and without a dropper it would be so easy to spill some. It can be mixed with other skin care products but I use it on its own and I massage it till it gets absorbed, which takes one minute or so. I feel my skin tingling soon after applying it but the feeling lasts few seconds, not more than that, and I haven’t experienced any redness or irritation. I do wear sunblock everyday as suggested, I recommend you to do the same all year round regardless of what skin care product you use but, if you’re thinking of using lactic acid you must protect your skin. I’ve noticed my skin looks firmer after two weeks, it looks more radiant but not greasy, my skin looks fresh and pores are minimized so it works on my skin. I don’t know if it’s too aggressive on very sensitive skin, I can only tell my experience and, so far, it’s positive.
Have you tried it? Are you planning to try it? Let me know!

the_ordinary_lactic_acid_review


Italian version:

Ciao fatine,
the ordinary è una delle marche di cui si sente parlare più spesso ultimamente, è molto economica e ci sono tanti prodotti interessanti da provare, quindi capisco perfettamente perché sia tanto chiacchierata, tanto che ho comprato diversi prodotti che sto provando un po’ alla volta.
the_ordinary_lactic_acid_review
Oggi vi parlerò dell’acido lattico e, come prima cosa, vediamo come viene descritto: L'acido lattico è un alfaidrossiacido che esfolia la pelle. Questa formulazione al 10% offre un'esfoliazione delicata e contiene Tasmannia lanceolata pura, una bacca nota per ridurre i segni dell'infiammazione e delle reazioni spesso associate all'esfoliazione. Una formula più delicata, con una concentrazione del 5%, è disponibile.

Questa formula contiene un derivato della Tasmannia lanceolata che contribuisce a ridurre l'irritazione associata all'uso dell'acido. Tale derivato è di origine vegetale e cambia colore a seconda della stagione, pertanto tale variazione di colore potrebbe risultare evidente nella formula. 

Controindicazioni: non utilizzare l'acido lattico su pelle sensibile, desquamata o lesionata. Fare riferimento alla nota relativa alla protezione solare aggiuntiva e alle altre avvertenze fornite nelle istruzioni. 


Il pH di questa formula è circa 3.8. L'acido lattico ha un pKa pari a 3.8 e il pKa è l'aspetto più importante da considerare nelle formulazioni di acidi. Il pKa implica la disponibilità dell'acido. Quando i valori di pKa e pH sono vicini, si crea un equilibrio ideale tra acidità e alcalinità, massimizzando l'efficacia dell'acido e riducendo l'irritazione. Valori di pH più elevati in tal caso comporterebbero un aumento dell'alcalinità che, contrariamente a quanto si possa pensare, renderebbe la formula ancor più irritante rispetto al caso in cui la formula fosse più acida. 

Nota: anche se l'acido lattico può produrre rapidi benefici visibili, in genere consigliamo forme indirette di esfoliazione della pelle piuttosto che forme dirette come questa formula, a causa della potenziale infiammazione e reazione associate all'uso di acidi. Consultare la scheda del prodotto Precursore acido non-acido di NIOD per riferimento.

the_ordinary_lactic_acid_review

Io lo applico la sera, è fornito di un contagocce che permette di prelevare la giusta quantità di prodotto, è liquido come l’acqua quindi senza il contagocce sarebbe facile versarlo. Può essere mischiato con altri prodotti di skin care ma io lo uso da solo e lo massaggio fino a che non si assorbe, il che avviene in un minuto o giù di lì. Subito dopo averlo applicato sento un leggero formicolio, ma è una sensazione che dura veramente poco, qualche secondo, e non ho avuto pelle arrossata o irritazioni di nessun tipo. Io uso la protezione solare ogni giorno come consigliato, vi consiglio di usarla tutto l’anno a prescindere dalla skin care routine che avete ma, se state pensando di usare l’acido lattico dovete proteggere la vostra pelle. Ho notato che dopo due settimane di utilizzo la mia pelle risultava più tonica, più luminosa ma non unta, ha un aspetto fresco e i pori risultano meno visibili quindi, su di me, funziona. Non so se possa essere aggressiva sulle pelli sensibili, posso solo parlarvi della mia esperienza personale e, finora, è positiva.
Voi l’avete provato? Avete intenzione di provarlo? Fatemi sapere!


Monday 6 August 2018

It nail art


Hi fairies,
Are you a fan of Stephen King’s novels? I read my first one during summer break when I was a teen and, in spite of not loving horror movies and novels, I really loved that book because he’s such a good writer I couldn’t put the book down no matter how scary it was! I’ve read many more after that one, even though I still miss so many as he wrote really lots of novels  and it’s hard to catch up! Do you know which book I read first? It was IT, one of the scariest and coolest story ever! I watched the movie as well and I loved it but, as usual, the book is more detailed. Last year the sequel came out and IT was suddenly very popular again and, even if I’m late, here’s my IT inspired nail art! This could be a great Halloween nail art, but here I am, in summer, with my IT nails!
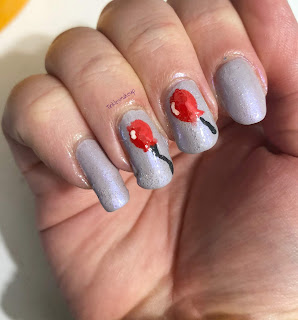
I chose a lavender grey nail polish as background, similar to a cloudy and gloomy sky, and I added a layer of glittery nail polish just because glitters are awesome! I painted red balloons on my middle and ring finger and basically that’s it, it’s super simple! I hope you like it!


it_nail_art


Italian version:

Ciao fatine,
Vi piacciono I romanzi di Stephen King? Io ho letto il primo durante le vacanze estive quando ero adolescente e, sebbene non amassi i film e i romanzi horror, il libro mi è piaciuto molto perché lui scrive benissimo e non riuscivo a smettere di leggere nonostante mettesse molta paura! Dopo quello ne ho letti altri, anche se me ne mancano ancora tanti dato che ha scritto innumerevoli romanzi ed è difficile non rimanere indietro! Sapete qual era il primo libro che ho letto? Si trattava di IT, una delle storie più paurose e affascinanti di sempre! Ho visto anche il film e mi è piaciuto ma, come sempre, il libro è ricco di maggiori dettagli. L’anno scorso è uscito il sequel e IT è diventato nuovamente popolare e, anche se in ritardo, ecco la mia nail art a lui ispirata! Questa potrebbe essere una nail art per Halloween, ma eccomi qui, in estate, con le mie unghie dedicate a IT!
it_nail_art
Ho scelto uno smalto grigio lavanda come sfondo, un colore simile a un cielo nuvoloso e plumbeo, e ho aggiunto una passata di smalto con i glitter perché i glitter sono sempre una buona idea! Ho disegnato dei palloncini rossi sul medio e sull’anulare e praticamente la nail art è terminata, è semplicissima! Spero vi piaccia!

Products used:

essie ridge filler base coat

kiko nail care gel look top coat

kiko power pro nail polish no 079

kiko nail polish no 276

Americana acrylic paint in red, black and white


it_nail_art

Thursday 2 August 2018

Half circles nail art


Hi fairies,
This is a very easy nail art I do when  I have no time to spend on my nails, and it never fails to get lots of compliments! This time I picked a holo nail polish and I applied on my index, middle finger and thumb while on the other two nails I applied a creamy purple nail polish. On my holo background I drew two half circles, you can place them wherever you want, and I outlined them with a dotted curve line following their shape. On the rest of my nails I drew a dot line with the holo nail polish and that was it, I hope you like it!

half_circles_nail_art


Italian version:

Ciao fatine,
Questa è una nail art facilissima che faccio quando non ho tempo da dedicare alle mie unghie, e non manca mai di ricevere molti complimenti! Questa volta ho scelto uno smalto olografico che ho applicato sull’indice, sul medio e sul pollice, mentre sulle due unghie restanti ho usato uno smalto creamy viola. Sullo sfondo olografico ho disegnato due semicerchi che possono essere posizionati dove si preferisce, e li ho contornati con una linea curva fatta di pois che ne segue la forma. Sul resto delle unghie ho disegnato una linea di pois con lo smalto olografico, ed è tutto, spero vi piaccia!

half_circles_nail_art

Products used:

essie ridge filler base coat

kiko nail care gel look top coat

kiko power pro nail lacquer no 081

americana acrylic paint in black


half_circles_nail_art


Wednesday 1 August 2018

One product review paint glow glitter me up liner


Hi fairies,
As you might know by now I really love glitters and I would wear them every day to run errands but I realize it would be a bit too much so I don’t! it’s very hard to find a good glitter eyeliner, they usually release just few glitters, the application is sketchy and it’s basically not worth the effort. I saw this brand at maquillalia and I decided to try their glitter liners, which are described as follows: For eyes that sparkle, our Glitter ME up! Eye Liner is perfect for those fine liners to dazzle and impress. In a selection of 8 stunning neon colours: gold, green, blue, red, pink, silver, white and purple (fuchsia). Price 3.50 €.


What I like: the brush applicator is stiff enough to pick up glitters but not too stiff to apply them on the lid. It releases a fairly even amount of glitters, you don’t need to go over the line you’ve traced several times, which is impressive considering how cheap it is. Glitters are not chunky nor too tiny, they show and I like using them in the inner corner as well, not just as regular eyeliner. It stays on quite well, I’ve never noticed any fall out on my cheeks even when I wear it for several hours.

What I don’t like: the packaging is a tube and I don’t know if it’s easy to get product out when there’s not much of it left, I hope it will.

My verdict: definitely one of the best glitter liners I’ve ever tried, it’s cheap, easy to apply and packed with glitters, it also comes in several shades, what more could you ask for?!


Italian version:

Ciao fatine,
Come ormai probabilmente sapete amo I glitter e li userei tutti i giorni anche per andare a fare la spesa, ma mi rendo conto che sarebbe esagerato quindi non lo faccio! È molto difficile trovare un buon eyeliner glitterato, di solito non rilasciano molti glitter, l’applicazione è disomogenea e non vale la pena fare tutto quello sforzo per un risultato scarso. Ho scoperto questo marchio su maquillalia e ho deciso di provare uno dei loro eyeliner glitterati, che sono descritti come segue: per occhi che brillano, il nostro Glitter ME up! Eye Liner è perfetto per realizzare quelle linee sottili che ammaliano e colpiscono. Disponibile in una selezione di 8 fantastici colori neon, oro, verde, blu, rosso, rosa, argento, bianco e viola. Prezzo 3.50 €.

Cosa mi piace: il pennellino applicatore è sufficientemente rigido per prelevare i glitter ma non troppo rigido da rendere l’applicazione sulla palpebra difficoltosa. Rilascia una discreta quantità di glitter, non serve ripassare la linea più e più volte, il che è incredibile considerando il prezzo basso che ha. I glitter non sono grandi e non sono troppo piccoli, sono visibili e a me piace usarli anche nell’angolo interno dell’occhio, non solo come un classico eyeliner. Ha una buona durata, non ho mai notato di avere glitter sulle guance, nemmeno quando lo indosso per molte ore.

Cosa non mi piace: la confezione è a forma di tubo e non so se sarà difficile prelevare il prodotto quando starà per finire, spero di no.


Il mio verdetto: sicuramente uno dei migliori eyeliner glitterati che abbia mai provato, costa poco, è facile da applicare ed è pieno di glitter, inoltre è disponibile in diversi colori, non credo si possa chiedere di più!


Featured post

World of beauty neroli vivace nuova linea / new line

Hi fairies, I’m very pleased to have the chance to try the new Neroli Vivace line by World of beauty and I’m thrilled to talk about it to...