Saturday, 30 December 2017

One product review Sephora wonderful cushion matte lip cream

Hi fairies,
Trying new lip products is always exciting for a makeup lover like myself, so you can imagine how happy I was when Sephora launched a cushion line, with lip and cheek products featuring the cushion system, so popular in Korea and now here as well! The Sephora line for lips is matte, which is a plus for me, that’s why I purchased one without even looking for reviews.
Let’s see how this line is described: What it is:
A full-coverage lip stain that comes with a cushion-tip applicator to create bold, pigmented looks and is made with shea butter for ultimate comfort.

What it does:
This new shea butter-enriched formula comes with a flexible cushion applicator that enables you to create two ultra-trendy looks: a gradient effect gives lips a just-bitten look, and a high-coverage effect creates the look of fuller lips. The formula offers intense color and a powdery, matte finish. -For a full lip look, gently squeeze the tube to dispense the product.
-Apply from the center to the corners of your mouth.

-For a gradient effect, gently squeeze the tube to dispense the product.
-Apply only at the center and use the side of the cushion applicator to smudge the color outward to the corners of your mouth. Price 8.00 $ -10.90 €


What I like: the packaging is adorable, Barbie pink with fuchsia lip marks, very girly and kawaii just like most Korean beauty products, definitely appealing. The lid is black and when you open it there’s the cushion applicator, which is definitely unique. The color is full and even, one layer is enough to completely coat your lips, so that’s definitely a pro. It’s easy to get the color out of the tube, the cushion works well and there’s no waste of product whatsoever.

What I don’t like: the product isn’t matte, it’s creamy and it doesn’t set . I don’t know if I apply too much of it but I’ve always applied a thin layer of it, and it still doesn’t set. It’s a beautiful creamy lipstick but it claims to be matte and it’s not. It feathers out a lot, it gets better with a lip pencil along the edges but it still smudges a bit especially if I drink or eat. It’s not long lasting for the reasons I’ve just mentioned, it doesn’t set and it moves really easily, more than any other creamy lipsticks I own. I don’t like wearing it because of that, I don’t feel comfortable with it as I never know if I look like a clown or not.

My verdict: for me is a flop, I don’t recommend it and I wouldn’t repurchase it, it’s too creamy and I don’t like its texture. Most of all it’s not matte as it says, I bought it expecting it to be and I’ve been very disappointed.


Italian version:

ciao fatine,
provare nuovi prodotti labbra è sempre interessante per un’amante del makeup come me, potete quindi immaginare quanto sia stata felice quando Sephora ha lanciato una linea cushion, con prodotti labbra e guance caratterizzati dal sistema cushion, così famosa in Corea e ora anche da noi! Questa linea labbra di Sephora è matte, che per me è un pregio, ecco perché ne ho acquistato uno senza nemmeno leggere qualche recensione.
Vediamo come viene descritta la linea:  Il primo rossetto a cuscinetto di Sephora, ispirato alla nuova gestuelle di moda in Corea, per un make-up sorprendente.
La sua formula, arricchita con burro di karité e olio di semi di cotone, abbinata a un applicatore "a cuscinetto" inedito in Sephora, veste le labbra di colori incredibilmente coprenti e un finish mat cipriato impossibile da ottenere con un altro prodotto Sephora.

Per quale tipo di make-up?
Una nuova texture "gommosa" incapsulata in un cuscinetto, che, per la prima volta in Sephora, consente di creare 2 risultati make-up ultra tendenza con 1 solo prodotto :
- Labbra sfumate , effetto "labbra mordicchiate".
- Labbra piene, risultato alta coprenza.

I plus :
- Applicazione "cuscinetto" per 2 risultati make-up.
- Colore intenso e finish mat cipriato.
- Labbra levigate e senza imperfezioni.
Prezzo 8.00 $ -10.90 €.


Cosa mi piace: il packaging è adorabile, rosa Barbie con labbra fucsia, molto femminile e kawaii come la maggior parte dei prodotti di bellezza coreani, sicuramente attraente. Il tappo è nero e, quando lo si toglie, compare l’applicatore a  cuscinetto, che è decisamente unico. Il colore è pieno e uniforme, uno strato è sufficiente per coprire le labbra completamente, e questo è senza dubbio un pregio. È facile far fuoriuscire il prodotto dal tubo, il cuscinetto fa il suo lavoro e non c’è assolutamente spreco di prodotto.
il prodotto non è opaco, è cremoso, e non si fissa . Non so se ne applico troppo ma cerco sempre di stenderne uno strato sottile e, nonostante questo, non si fissa. È un bel rossetto cremoso ma viene descritto come opaco. Sbava moltissimo, la situazione migliora leggermente contornando le labbra con una matita labbra ma sbaffa comunque parecchio se bevo o mangio. Non è a lunga durata per le ragioni che ho appena elencato, non si fissa e si muove molto facilmente, più di ogni altro rossetto cremoso che possiedo. Non mi piace usarlo per questi motivi, non mi sento a mio agio perché non so mai sembro un clown oppure no.


Il mio verdetto: per me è un flop, non lo consiglio e non lo ricomprerei, è troppo cremoso e non mi piace la sua texture. La cosa peggiore è che non è matte come dichiara di essere, l’ho acquistato aspettandomi che lo fosse e sono rimasta molto delusa.


Friday, 29 December 2017

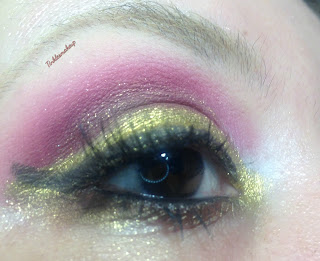
eye makeup look new year's eve

Hi fairies,
Have you already planned your new years eve makeup? Here’s mine, in case you need some ideas and you like to sparkle like I do! I think glitters and sparkles are a must on new years, even if you’re not a fan of them you should add a tiny bit of them once a year!
I first applied a light taupe in my crease as my transition color, and on top of it I added a burgundy eyeshadow; I built this color up because it was very pigmented and it’s easy to apply too much of it, it’s better to apply a small amount and then intensify it when needed. With a small blending brush I gave more depth to my crease with a brown eyeshadow . on my lid I first applied a gold eyeshadow and then I patted on some gold glitters. I carved my crease with some concealer, which was the base for the gold eyeshadow. I completed the look with a winged liner and some mascara, and that was it, happy new year to all of you!

eye_makeup_look_new_years_eve

eye_makeup_look_new_years_eve


Italian version:

Ciao fatine,
Avete già deciso quale sarà il Vostro trucco per capodanno? Questo è il mio, nel caso aveste bisogno di qualche idea e vi piaccia brillare tanto quanto piace a me! Credo che i glitter e i tocchi di luce siano un must per capodanno, anche se non li amate particolarmente dovreste aggiungerne una piccola quantità una volta l’anno!
Prima ho applicato un ombretto color talpa chiaro nella piega come colore di transizione, e al di sopra ho aggiunto un ombretto bordeaux; ho costruito questo colore  poco alla volta perché era molto pigmentato ed è facile applicarne troppo, è meglio applicarlo poco alla volta e poi intensificarlo quando serve. Con un pennello piccolo da sfumatura ho dato più profondità alla piega con un ombretto marrone. Sulla palpebra mobile ho prima applicato un ombretto color oro e sopra ho picchiettato dei glitter dorati. Ho definito la piega con del correttore, che è servito da base per l’ombretto color oro. Ho completato il look con una riga di eyeliner e del mascara, ed è tutto, buon anno a tutti!

eye_makeup_look_new_years_eve

eye_makeup_look_new_years_eve


Products used:

lime crime eyeshadow brightener

urban decay eyeshadow naked 2

urban decay eyeshadow foxy

lime crime venus palette eyeshadow muse

jeffree star androgyny palette eyeshadow fetish

lime crime venus palette eyeshadow icon

sugarpill loose pigment in goldilux

kiko vibrant eye pencil no 600

kiko long wear eye liner

kiko overblown mascara

eye_makeup_look_new_years_eve


Thursday, 28 December 2017

One product review kiko daring look eye marker

Hi fairies,
If I had to pick only a couple of products I couldn’t live without, eyeliner would definitely be one of them! Even when I just apply foundation, lipstick and mascara I have to add a winged liner, I love the way my eyes look, they look bigger and lifted up.
 I like trying many eyeliners even if my favorite ones are those with a brush rather than a felt tip because I feel they allow me to draw a neater line and to control the thickness easily, but I’m curious so I buy felt tip ones as well! This kiko one has got a different shape from most eyeliners, that’s why I’ve purchased it. Let’s see how it’s described: Deep black eye marker. The small, compact tip effortlessly slides along the lash line for a precise, well-defined line. The glide-on tip leaves the ideal amount of product on the eyelids, drawing an even and smudge-free line. This touch of deep black adds depth to the eyes, highlighting their shape and colour, and never smudges. Price 9.90 €.


photo from pinkmelon.de

What I like: I wanted to try a marker liner but I was aware it could be a bit tricky to get the desired line so, with that in mind, I can say the tip is not too stiff and it allows to draw a line without pushing too much. Just like mascaras, color starts to be really full and even after few uses, at first I thought it wasn’t pigmented at all but I was wrong, it just needed time to coat the tip evenly. It’s easy to draw thick lines as long as thin ones, it all depends on the pressure you apply. It’s matte and it’s an intense black that shows on any eyeshadow colors. It’s long lasting, it doesn’t smudge, it doesn’t feather and it doesn’t fade away during the day.

What I don’t like: it’s quite big so, at first, I had to get used to it as I was used to regular eyeliners, way thinner than this one. It smells of alcohol and it’s a strong smell, I’m aware it can be annoying for some people. It sets quite fast and, while I think this is a pro, it can be a con because there’s no time to fix mistakes.


My verdict: I would repurchase it because it’s not expensive and it does a good job even if it takes a while to get the hang out of it and to get an even and intense color, but I wouldn’t recommend it to those who are new at applying eyeliner because it’s not the simplest one to use.

Italian version:

Ciao fatine,
Se dovessi scegliere solo un paio di prodotti di cui non posso fare a meno, l’eyeliner sarebbe sicuramente uno di questi. Anche quando applico solo fondotinta, mascara e rossetto devo aggiungere una riga di eyeliner, mi piace molto come enfatizza i miei occhi facendoli sembrare più grandi e alzando molto lo sguardo.
Ho provato molti eyeliner anche se i miei preferiti sono quelli con l’applicatore a pennellino piuttosto che quelli con la punta in feltro perché mi permettono di tracciare una linea più precisa e di controllare facilmente lo spessore, ma sono curiosa quindi mi piace provare anche quelli con la punta in feltro. Questo di kiko aveva una forma un po’ diversa dagli altri , ecco perché ho deciso di acquistarlo! Vediamo come viene descritto questo di kiko: Marcatore occhio di un nero profondo. La punta piccola e compatta scivola senza sforzo lungo l’attaccatura delle ciglia per una linea precisa e ben definita. La punta che scivola lascia la quantità ideale di prodotto sulle palpebre, disegnando una linea uniforme e priva di macchie. Questo tocco di nero profondo aggiunge profondità agli occhi, evidenziando la loro forma e colore senza mai sbavare. Disponibile in nero intenso. Oftalmologicamente testato. Senza profumo. Senza parabeni. Solo uso esterno. Prezzo 9.90 €

photo from reallyree.com

Cosa mi piace: volevo provare un eyeliner a pennarello ed ero consapevole che avrebbe potuto essere un po’ difficoltoso tracciare una linea così come la desideravo, quindi avendo ben presente questa cosa, posso dire che la punta non è troppo rigida e permette di tracciare una linea senza dover spingere troppo. Proprio come per i mascara, il colore diventa veramente pieno e uniforme dopo qualche applicazione, all’inizio pensavo non fosse sufficientemente pigmentato ma mi sbagliavo, serve solo del tempo affinchè la punta si imbeva bene di colore. È facile disegnare linee sia spesse che sottili, dipende solo dalla pressione che si esercita. È opaco ed è di un nero intenso che si vede bene sopra ogni colore di ombretto. È a lunga durata, non sbava, non cola, non sbiadisce nell’arco della giornata.

Cosa non mi piace: è piuttosto grande, quindi ho dovuto prenderci la mano perché ero abituata ai classici eyeliner, che sono molto più piccoli di questo. Odora di alcool in modo piuttosto forte, mi rendo conto che ad alcuni possa dare fastidio. Si fissa piuttosto velocemente e, se questo è sicuramente un lato positivo, può essere anche negativo perché non permette di correggere eventuali errori.

photo from reallyree.com


Il mio verdetto: lo riacquisterei perché è poco costoso e fa un buon lavoro anche se ci vuole un po’ per acquisire familiarità col prodotto e per ottenere un colore pieno e uniforme, ma non lo consiglierei a chi non ha molta pratica con l’applicazione dell’eyeliner perché non è sicuramente facile da usare. 


Wednesday, 27 December 2017

New years eve nail art

Hi fairies,
I’ve been thinking of a nail art for new years eve and this year I’ve decided for a simple one as I’ve already done the champagne one and the one with the year’s numbers; this one is really easy to do and I hope you like it! You can pick a color of your choices for the background, I picked a glittery red On my thumb and ring finger I drew white dots all around the edge of the nail to represent a clock, and then I added the hands showing it’s just few minutes before midnight, and that was it, happy new year!

new_years_eve_nail_art


Italian version:

Ciao fatine,
Ho pensato a una nail art per Capodanno e quest’anno ne ho scelta una semplice, visto che ho già fatto quella con la bottiglia di champagne e quella con I numeri dell’anno; questa è facilissima e spero vi piaccia!  Potete scegliere un colore a piacere per lo sfondo, io ho optato per un rosso glitterato. Sul pollice e sull’anulare ho disegnato dei pallini bianchi tutto intorno al bordo dell’unghia per rappresentare un orologio, poi ho disegnato le lancette che indicano che mancano pochi minuti a mezzanotte, ed è tutto, buon anno a tutti!

Products used:

kiko nail care 3 in 1 shine fortifying base and top coat

zoya nail lacquer zp 536 valerie


Americana acrylic paint in white

new_years_eve_nail_art

Sunday, 24 December 2017

One product review maybelline super stay matte ink liquid lipstick

Hi fairies,
I usually don’t fall for hyped up products unless I really like them, but this time I have even if I’ve heard some negative reviews on them. I wanted to try one and see how it worked on my lips so I bought a beautiful purple orchid on sale! I’m talking about the Maybelline super stay matte ink liquid lipsticks, let’s see how they’re described: intensely perfect, perfectly intense. Ink your lips in up to 16 HR saturated liquid matte. Price 9.49 $.


What I like: I like the color, it’s a vibrant and full purple orchid, it goes on evenly and lips are fully covered with one layer. I like the packaging, it’s the same color of the lip tint and it’s easy to find it among other lip tints and I own many of them so find the one I’m looking for can be an issue sometimes! They are long lasting, you can eat and drink and they will stay on till you remove your makeup. They don’t set into fine lines and they don’t feel dry on my lips, they are quite comfortable.

What I don’t like: the doe foot applicator has got a weird shape and I find it a bit tricky to follow my lip shape, I don’t know if it’s just my issue or if anyone else feels the same, let me know in the comments. It feels very sticky and this feeling doesn’t go away once it sets, it still feels sticky after hours of wearing and it’s quite annoying. It’s hard to remove, even with a biphasic makeup remover I have to rub quite hard and it’s the first time it happens to me. it stains my lips but maybe lighter colors don’t. the color range is classic, there aren’t unique shades.


My verdict: I won’t recommend them, cons are way too many in my opinion and, for the price point, there are better liptints on the market, there are actually cheaper ones that perform better.


Italian version:

Ciao fatine,
Di solito non compro prodotti solo perchè se ne parla tanto, a meno che non mi piacciano veramente, ma questa volta ci sono cascata nonostante abbia sentito pareri negativi su questo prodotto. Ne volevo provare una e vedere come si comportava sulle mie labbra, quindi ho acquistato un bel viola orchidea a prezzo scontato! Sto parlando dei Maybelline super stay matte ink liquid lipsticks, vediamo come vengono descritte: intensamente perfette, perfettamente intense. Colora le tue labbra con 16 colori pieni HR di tinte opache. Prezzo 9.49 $.


Cosa mi piace: mi piace il colore, è un viola orchidea pieno e vibrante, si applica uniformemente e le labbra vengono coperte con una sola passata. Mi piace la confezione perché è dello stesso colore del prodotto all’interno e questo rende facile individuarla in mezzo alle altre tinte, cosa che può essere un problema per me che ne ho tante! Sono a lunga durata, potete mangiare e bere e rimarranno al loro posto fino a che non le togliete. Non si infilano nelle rughette e non mi seccano le labbra, sono abbastanza confortevoli.

Cosa non mi piace: l’applicatore ha una forma strana che rende un po’ difficile seguire il contorno delle labbra, non so se è solo un mio problema o se qualcun altro lo ha riscontrato, fatemelo sapere nei commenti. È molto appiccicoso e questa sensazione non se ne va una volta che si fissa, rimane appiccicoso anche dopo ore ed è abbastanza antipatico. È difficile da togliere, anche con uno struccante bifasico devo strofinare parecchio ed è la prima volta che mi succede. Tinge le labbra, ma forse i colori più chiari non danno questo problema. La gamma di colori è classica, non ci sono colori unici.


Il mio verdetto: non li consiglio, i lati negativi sono maggiori di quelli positivi secondo me e, per il prezzo che hanno, se ne trovano di migliori in commercio, anzi ce ne sono di migliori anche a un prezzo più basso.


Saturday, 23 December 2017

Eye makeup look smoky mauve

Hi fairies,
A smoky eye is always the best way to look sexy and sophisticated, it’s fairly easy to do and it can be customized by adding touches of colors in the inner corner or a wash of color in the crease, the possibilities are endless! I like wearing it during holiday season, it could be my go to for new years’ eve, this my version for this Christmas: I started by softly defining my crease with a matte taupe on a fluffy blending brush, it’s important to create a gradient and to avoid harsh lines. I patted a charcoal grey eyeshadow on my lid staying below my crease, and then I brought the color up with a blending brush. I didn’t use black because I’m very pale. I kept blending and adding eyeshadow when needed till I got the color pay off I was looking for. In the middle of my lid I patted a purple pigment with grey undertone, and in my inner corner I used a metallic aqua color.I highglighted my browbone area with a vanilla eyeshadow. I completed the look with a winged liner and mascara, and that was it, I hope you like it!

eye_makeup_look_smoky_mauve

eye_makeup_look_smoky_mauve

eye_makeup_look_smoky_mauve


Italian version:

Ciao fatine,
Uno smoky eye è sempre il modo migliore per avere un look sexy e sofisticato, è abbastanza facile da realizzare e si può personalizzare aggiungendo tocchi di colore nell’angolo interno o un velo di colore nella piega, le possibilità sono infinite! Mi piace indossarlo durante il periodo delle feste, potrebbe essere la mia scelta per capodanno, questa è la mia versione per questo natale: ho iniziato a definire leggermente la piega dell’occhio con un ombretto opaco color talpa su un pennello largo da sfumatura, è importante creare una sfumatura omogenea ed evitare le linee nette. Ho picchiettato un ombretto grigio antracite sulla palpebra rimanendo al di sotto della piega dell’occhio, e poi ho portato il colore verso l’alto con un pennello da sfumatura. Non ho usato il nero perché ho la carnagione molto chiara. Ho continuato a sfumare e ad aggiungere ombretto fino a che non ho ottenuto l’intensità che desideravo. Al centro della palpebra ho picchiettato un pigmento viola dal sottotono grigio, e nell’angolo interno ho usato un colore metallico verde acqua. Ho illuminato l’arcata sopraccigliare con un ombretto color vaniglia. Ho completato il look con una riga di eyeliner e del mascara, ed è tutto, spero vi piaccia!
eye_makeup_look_smoky_mauve

eye_makeup_look_smoky_mauve


Products used:

lime crime eyeshadow brightener

urban decay eyeshadow in foxy

urban decay eyeshadow in naked 2

kiko Milano water eyeshadow no 106 space charcoal

kiko Milano infinity eyeshadow no 04

kiko Milano infinity eyeshadow no 403

kiko Milano infinity eyeshadow no 406

kiko Milano infinity eyeshadow no 203

nyx prismatic eyeshadow in mermaid

kiko Milano smart eye pencil no 813

kiko Milano long wear pen liner


kiko Milano overblown mascara

Thursday, 21 December 2017

One product review kiko mixing solution

Hi fairies,
I’m sure you’ve all heard about Mac mixing medium and how wonderful it is, I have but I’ve also heard it’s not very different from water so I wasn’t willing to pay 20 $ or more to get it! I decided to try Kiko one instead, because I use pigments very often but I don’t have the need to use them wet, so I thought this one would have worked just fine.

Let’s see how it’s described: Mixing solution for Pigment Loose Eyeshadow. A delicate texture, water and glycerin based, capable of giving the eyeshadow the creaminess necessary to ensure maximum blendability, adherence and hold. Also accentuates the intensity of the colour and brightness of the pearl particles for an even more dramatic colour impact. Hypoallergenic = formulated to ensure minimum instance of allergic reactions. Price 3.90 £- 3.90 € for 50 ml/1.69 FL OZ.


kiko_mixing_solution_review

It comes in a see through plastic bottle with a dropper applicator that prevents from spilling too much product, I think it’s the best applicator for it as you just need a tiny drop each time and wasting it would be really easy, especially for someone as clumsy as I am! It looks like water both in color and in texture, and it’s really quick to mix it with loose pigments. I usually put a drop on a clear and smooth surface, which could be the pigment’s jar’s lid, I add the desired amount of powder and I mix them till I get the right consistency. It’s scent free, which is good, and it definitely helps pigments to stick to your lid and to pop up and look more vibrant. I’ve never experienced any creasing when using it, and eyeshadows have stayed on till I remove my makeup. The only issue I have is you really need just one drop of it , if you use more than that you’ll either have to add more powder, and you won’t need it all, or you’ll have to throw it away and start all over again. It takes a while and a bit of practice not to drop too much of it out of the bottle but, once you get the hang out of it, it works well!
I haven’t tried Mac mixing medium so I can’t tell you if it’s better quality, but I don’t think ingredients are totally different from this product so I guess they’re quite similar. I haven’t experienced any redness or allergic reaction to it, it’s totally safe on my eyes.
Why not using water? Well, you can and I do that too, it’s basically the same, to be honest I haven’t noticed any difference whatsoever, but this solution is inexpensive and it lasts forever so I reach for it anyway.
Do I recommend it? I do, but it’s not something you have to have, you can use water if you want to and the result will be the same.
kiko_mixing_solution_review

Italian version:

Ciao fatine,
Sono sicura che tutte avete sentito parlare del Mac mixing medium e di quanto sia valido, io sì ma ho anche sentito che non è tanto diverso dall’acqua, per cui non ero disposta a pagare più di 20$ per averlo! Ho deciso, invece, di provare quello Kiko, perché uso spesso pigmenti ma non ho la necessità di applicarli bagnati di frequente, e ho pensato che questo prodotto avrebbe, probabilmente, funzionato lo stesso.
Vediamo come viene descritto:  Una texture delicata, a base di acqua e glicerina, in grado di  conferire all’ombretto la cremosità necessaria per garantire massima sfumabilità, aderenza e tenuta.Accentua inoltre l'intensità del colore e la brillantezza delle particelle perlate per un impatto cromatico ancora più deciso. Clinicamente testato = formulato per ridurre al minimo il rischio di allergie. Prezzo 3.90 £- 3.90 € per 50 ml- 1.69 FL OZ.

Si presenta in una bottiglia semi trasparente di plastica con un dosatore a gocce che evita di versarne troppo e, secondo me, questo è il miglior applicatore possibile per questo prodotto perché ne serve veramente una goccia, e  sarebbe facilissimo farne uscire una quantità eccessiva, specialmente per persone maldestre come lo sono io. Ha lo stesso colore e consistenza dell’acqua, e mischiarlo con i pigmenti richiede pochi secondi. Di solito ne verso una goccia su una superficie liscia, che può essere l’interno del coperchio del contenitore del pigmento, aggiungo la quantità di polvere sufficiente e li mischio fino ad ottenere la consistenza desiderata. Non ha profumo, il che è positivo, e aiuta molto a far aderire i pigmenti alla palpebra e a rendere i colori più intensi e vibranti. L’unico lato negativo è che ne serve veramente una sola goccia, se ne usate di più avete due opzioni: aggiungere più polvere, ma finirete con l’ottenere più prodotto di quello che vi serve, oppure buttare tutto e cominciare da capo. Dovete prendere la mano per non versarne più di quello che serve ma, una volta fatta pratica, funziona bene!
non avendo provato il Mac mixing medium non so dirvi se la sua qualità sia migliore, ma non credo che gli ingredienti siano totalmente diversi da quelli contenuti in quello Kiko, credo siano piuttosto simili. Non ho mai avuto rossori o reazioni allergiche, sui miei occhi è assolutamente sicuro.
Perché non usare dell’acqua? Potete tranquillamente farlo, lo faccio anche io e non ho notato differenze sostanziali, ma questa soluzione costa pochissimo e vi durerà una vita quindi io la preferisco.

kiko_mixing_solution_review


La consiglio? Sì, ma non è un prodotto indispensabile, si può sostituire con semplice acqua se preferite, e il risultato sarà lo stesso.

Wednesday, 20 December 2017

Christmas tree nail art

Hi fairies,
It’s cold outside and there’s nothing better than staying home, sipping hot tea or coffee, snuggling up with your partner and your children and pets, sitting on your couch with a cozy blanket wrapped up around you! I took inspiration from my Christmas tree to decorate my nails, it’s a very festive nail art!
I applied a metal burgundy nail polish on all my fingers but my ring and middle finger, where I used a green nail polish; I topped the burgundy with some glitters and then I drew sideways silver lines on my green nails. With a dotting tool I added some ornaments and that was it, I hope you like it!


christmas_tree_nail_art

Italian version:

Ciao fatine,
Fuori fa freddo e non c’è niente di meglio che stare in casa, sorseggiando del tè o del caffè caldo, facendoci le coccole col nostro partner, i nostri figli e i nostri animali, seduti sul divano avvolti una coperta morbida! Mi sono ispirata all’albero di natale per decorare le unghie, è una nail art molto festiva!
Ho usato uno smalto bordeaux metallizzato su tutte le unghie tranne che sull’anulare e sul medio, dove ho usato uno smalto verde; sul bordeaux ho aggiunto uno smalto glitterato e poi ho disegnato righe diagonali argentati sulle unghie verdi. Con un dotting tool ho aggiunto qualche pallina, ed è tutto, spero vi piaccia!

christmas_tree_nail_art
Products used:

kiko nails care 3 in 1 shine fortyfing base and top coat

essie nail polish no 106

kiko duo chrome nail lacquer no 397

catrice nail lacquer l.e. travelight story 02 skyline

essence nail polish special effect topper 01 it’s purplicious


kiko quick dry nail polish no 837

christmas_tree_nail_art

Tuesday, 19 December 2017

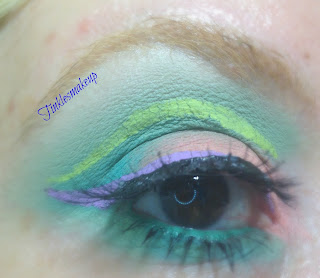
Eye makeup look grass green and peach

Hi fairies,
I’ve seen these kind of neon looks a lot on Instagram lately and I really like how they look, they’re unique and bold, not everyday looks that’s for sure but I rarely go for those ones, so why not trying to do a more dramatic one?!
I started by applying a matte grass green eyeshadow in my crease as my transition color and I blended it very well, I just wanted a hint of colour; I placed a mint green in the lower half of my crease and in my outer corner. I went back to the previous shade and I added a bit of it along the edges and I repeated these two steps till I was satisfied with the color pay off. On my lid I patted a matte peach eyeshadow. I used a purple liquid liner to draw my winged liner, and the look was almost complete, you could stop here if you like and I would too, but today I went ahead and I drew a white line in my crease, taking my time to get it as sharp and neat as possible and, as white liners aren’t completely opaque and when you apply them on top of a colourful eyeshadow they take a little bit of that colour, this time I got a neon teal line, which was exactly what I was looking for! I hope you like it!

eye_makeup_look_grass_green_peach

eye_makeup_look_grass_green_peach

eye_makeup_look_grass_green_peach


Italian version:

Ciao fatine,
Ho visto molti di questi look neon su instagram ultimamente e mi piace molto il loro effetto, sono unici e intensi, sicuramente non sono quei look da usare per tutti i giorni, ma del resto io raramente scelgo look da tutti i giorni, quindi perché non provare a farne uno più drammatico?
Ho iniziato applicando un verde prato nella piega dell’occhio come colore di transizione e l’ho sfumato molto bene, volevo che fosse solo un tocco di colore; ho usato un verde menta nella metà inferiore della piega dell’occhio e nell’angolo esterno. Ho poi ripreso il colore precedentemente usato e ne ho aggiunto un po’ lungo i bordi, ripetendo questi due passaggi fino a che non sono stata soddisfatta dell’intensità dei colori. Sulla palpebra ho picchiettato un ombretto opaco color pesca. Ho scelto un eyeliner liquido viola per la linea con la codina, e il look era quasi completo , potete fermarvi qui se volete e anche io lo farò sicuramente, ma oggi sono andata avanti e ho disegnato una linea bianca nella piega dell’occhio, prendendomi il mio tempo affinchè fosse il più netta e precisa possibile e, dato che gli eyeliner bianchi non sono mai completamente opachi e quando li si applica sopra a un ombretto colorato prendono un po’ del suo colore, in questo caso ho ottenuto una riga color azzurro neon, che era proprio quello che volevo! Spero vi piaccia!

eye_makeup_look_grass_green_peach

eye_makeup_look_grass_green_peach

Products used:

lime crime eyeshadow brightener

urban decay eyeshadow naked 2

colourpop powder eyeshadow checkmate

sugarpill cosmetics mono eyeshadow in mocha

colourpop powder eyeshadow wait for it

colourpop powder eyeshadow secrets

urban decay eyeshadow in foxy

kiko kajal kohl pencil no 111

lime crime liquid liner in citreuse

nyx cosmetics vivid brights liquid liner in vivid blossom 09


kiko overblown mascara

Monday, 18 December 2017

One product review nars eclat radiant creamy concealer

Hi fairies,
When it comes to concealers my standards are quite high, I look for certain things and if they don’t have them I discard them. I’m not too strict, it’s just there’s nothing worse than a concealer that emphasises fine lines in the under eye area and instantly ages myself of ten + years, so I avoid those one like plague!
Nars eclat concealer has got so many positive reviews that I decided to try it and see it myself if it was that good: Coveted by artists for its luxurious texture and luminous finish, new Radiant Creamy Concealer evens skin with lightweight medium to high buildable coverage. Enriched with hydrating, multi-action skincare benefits and light diffusing technology, it creates a softer, smoother complexion while instantly obscuring imperfections and diminishing fine lines and signs of fatigue.
Long wearing and crease-proof
Paraben-free, Alcohol free, Synthetic fragrance free, Non comedogenic. Price 29.00 €.

nars_eclat_radiant_creamy_concealer_review


What I like : it comes in a see through tube that allows to see how much product is left inside, which I appreciate; it’s got a classic sponge applicator that makes the application very easy and it prevents from any waste of product. The consistency is creamy, almost gel like, lightweight but not runny, it sticks very well to the skin but it doesn’t look cakey at all. It’s easy to blend, I usually prefer doing it with a beauty blender but you can use your fingers or any brush of your choice. What I love the most about this concealer is that it doesn’t crease into fine lines, it doesn’t add 10 years to my face, it looks smooth and it brightens up the area. It’s a medium coverage concealer, if you’ve got black circles it might not be enough for you.
It lasts up to 8 hours without smudging and without looking cakey. I haven’t tried it for longer but I guess it would perform well nonetheless.

What I don’t like : it’s definitely expensive, and it could be a problem because not everybody wants to spend that much on a concealer. If you’re a teen I wouldn’t recommend it because you can probably get away with low cost products without any creasing, you don’t need to spend 30 euros to get a good result. I was mentioning it’s not a full coverage concealer, I think it works well to brighten up the under eye area and to conceal light discolorations but not huge imperfections, keep that in mind.

nars_eclat_radiant_creamy_concealer_review

My verdict: one of the best concealers I’ve ever tried as far as I’m concerned, definitely expensive but it’s high quality so it’s worth the money. If you just need something to lighten up your under eye area you might try something cheaper, but all in all I would recommend it as it performs really well.


Italian version:

Ciao fatine,
Quando si parla di correttori sono piuttosto esigente, voglio che abbiano determinate caratteristiche e, se non le hanno, li scarto. Non è questione di essere rigidi, è solo che non c’è niente di peggio di un correttore che enfatizza le rughette del contorno occhi e aggiunge istantaneamente 10 o più anni al mio viso, quindi evito i correttori che lo fanno!
Nars eclat concealer ha talmente tante recensioni positive che ho deciso di provarlo e scoprire se fosse veramente così eccezionale:  Ambito dai truccatori per la sua consistenza lussuosa e la finitura luminosa, il nuovo Radiant Creamy Concealer uniforma la pelle con una coprenza modulabile da medio-leggera a elevata. Arricchito con ingredienti idratanti e multiazione, nutrienti per la pelle, e di una tecnologia di diffusione della luce, rende la carnagione più morbida e liscia, nascondendo istantaneamente le imperfezioni e riducendo le linee sottili e i segni di stanchezza.
Finitura resistente, anche alle screpolature
Senza parabeni, senza alcool, senza profumi sintetici, non comedogenico. Prezzo 29.00 €

nars_eclat_radiant_creamy_concealer_review

Cosa mi piace: la confezione è trasparente e permette di vedere quanto prodotto rimane all’interno, una caratteristica che apprezzo; ha un classico applicatore a spugnetta che rende molto semplice la stesura ed evita sprechi di prodotto. La consistenza è cremosa, simile ad un gel, leggera ma non liquida, aderisce molto bene alla pelle ma non risulta pesante. È facile da sfumare, io prediligo usare una beauty blender ma si ottiene un buon risultato con le dita o con un pennello a vostra scelta. Quello che più amo di questo correttore è che non si insinua nelle rughette d’espressione, non mi invecchia di dieci anni, rende la pelle liscia e illumina la zona del contorno occhi. Ha una copertura media, se avete delle occhiaie pronunciate potrebbe non andar bene. Ha un’ottima durata fino a 8 ore, non svanisce e non risulta pastoso; non l’ho provato per periodi più lunghi ma credo che si comporti bene comunque.

nars_eclat_radiant_creamy_concealer_review

Cosa non mi piace: è sicuramente costoso, e questo può essere un problema perché non tutti sono disposti a spendere così tanto per un correttore. Non lo consiglierei alle giovanissime perché possono ottenere dei buoni risultati con prodotti più economici, non avendo problemi per quel che riguarda rughette d’espressione. Stavo dicendo che non è un correttore a copertura totale, è ottimo per illuminare la zona del contorno occhi e per correggere lievi discromie, ma tenete a mente che non riuscirebbe a correggere imperfezioni importanti.

nars_eclat_radiant_creamy_concealer_review


Il mio verdetto: per quel che mi riguarda e per le mie esigenze è uno dei correttori migliori che abbia mai provato, costoso sì ma di ottima qualità, che vale il prezzo che costa. Se volete un correttore che illumini la zona perioculare e null’altro potreste orientarvi verso qualcosa di più economico, ma tutto sommato io lo consiglio perché regala ottime prestazioni.


Featured post

World of beauty neroli vivace nuova linea / new line

Hi fairies, I’m very pleased to have the chance to try the new Neroli Vivace line by World of beauty and I’m thrilled to talk about it to...