Thursday, 30 November 2017

Mushroom nail art

Hi fairies,
you know how much I love cute nail arts, especially food or veggies themed ones like this one, which is quite easy to do and it also makes me think of gnomes and fairies living in the woods!
I chose a metallic gold nail polish as my background and I dabbed an iridescent glittery nail polish on the tips of each nail; I decided to draw just one mushroom on my medium finger, that way it pops up nicely, but you can draw two or three if you want, it’s a matter of personal preferences. I drew the black shape first, to have a perfectly outlined mushroom eventually, and then I filled the shape in with white for the stem and red for the hat. Isn’t it cute? I love it and I hope you do too!

mushroom_nail_art

Italian version:

Ciao fatine,
Sapete quanto mi piacciono le nail art simpatiche, specialmente quelle a tema cibo e vegetali come questa, che è abbastanza facile da realizzare e mi fa anche pensare agli gnomi e alle fatine che vivono nei boschi!
Ho scelto uno smalto dorato dalla finitura metallica come colore di sfondo e ho picchiettato uno smalto con glitter iridescenti sulla punta delle unghie; ho deciso di disegnare solo un fungo sul medio, in modo da farlo risaltare bene, ma ne potete disegnare due o tre se volete, è questione di preferenze personali. Ho disegnato la sagoma nera prima, in modo da avere poi un fungo perfettamente contornato, e poi ho riempito la sagoma con del bianco per il gambo e del rosso per il cappello. Non è carina? Mi piace molto e spero piaccia anche a voi!

mushroom_nail_art

Products used:

kiko 3 in 1 shine nail care fortifying base and top coat

kiko arctic holidays nail polish no 004

models own nail polish no 236


Americana acrylic paint in black, white and red

mushroom_nail_art

Wednesday, 29 November 2017

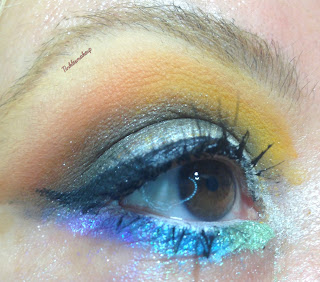
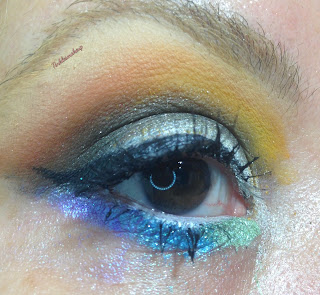
Eye makeup look caramel moon

Hi fairies,
This is a very bold and dramatic look I had so much fun doing! It’s definitely not an everyday look, sometimes I like to be daring though and I hope you do too!
I applied a shimmery white in the center of my lid without bringing it up to my crease, and then I picked a charcoal pigment and I placed it in the outer corner and in my crease. I blended the edges very well to defuse any harsh lines and I didn’t bring the color too high up as I had to add more colors in my crease. I did a gradient from yellow to rusty red, applying the yellow in the inner corner and ending with the rusty red in the outer corner. In my lower lashline I applied green, blue and purple, so basically I used rainbow colors. I completed the look with a winged liner and mascara, and that was it, I hope you like it!


Eye makeup look caramel moon

Eye makeup look caramel moon

Eye makeup look caramel moon

Italian version:

Ciao fatine,
Questo è un look molto drammatico e importante e mi sono divertita a realizzarlo! Non è sicuramente un look da tutti i giorni, ma qualche volta mi piace osare e spero che anche a voi piaccia!
ho applicato un ombretto bianco luminoso al centro della palpebra mobile senza portarlo troppo in alto verso la piega dell’occhio, e poi ho usato un pigmento grigio acciaio e l’ho applicato nell’angolo esterno e nella piega dell’occhio. Ne ho sfumato bene i contorni per eliminare eventuali righe nette, e non ho portato il colore troppo in alto perché dovevo aggiungere altri colori nella piega. Ho usato dei colori in gradazione dal giallo al rosso mattone, applicando il giallo nell’angolo interno e terminando con il rosso mattone nell’angolo esterno. Nella rima inferiore ho usato del verde, azzurro e viola, quindi ho usato tutti i colori dell’arcobaleno, e ho completato il makeup con una riga di mascara, ed è tutto, spero vi piaccia!

Eye makeup look caramel moon

Eye makeup look caramel moon

Eye makeup look caramel moon

Products used:

lime crime eyeshadow brightener

urban decay eyeshadow naked 2

kiko water eyeshadow space charcoal 106

urban decay eyeshadow foxy

kiko infinity eyeshadow 258

kiko infinity eyeshadow 207

mac cosmetics Marilyn Monroe l.e. how to marry

about face loose pigment high drama

about face loose pigment electric eel

occ cosmetics loose pigment atmosphere

kiko kajal kohl pencil no 101

kiko ultimate long wear eyeliner pen


kiko overblown mascara

Tuesday, 28 November 2017

One product review beauty formulas tea tree blemish gel

Hi fairies,
Do you use a cleanser on a daily basis? I do and my skin has improved since I have, it helps oily skin like mine a lot but there are moisturizing ones for dry skin as well and I think it’s a step we shouldn’t skip regardless of our skin type.

I’ve found out about the brand Beauty Formulas on Maquillalia.com and it’s so unexpensive I couldn’t resist trying several products, including this tea tree blemish gel : Beauty Formula Tea Tree Skin Clarifying Blemish Gel helps to target spots, blemishes and pore clogging bacteria for clearer looking skin.The invisible blemish gel activeingredients include witch hazel, menthol & peppermint giving you a soothing, cooling & refreshing feeling. Price 1.00 € for 30 ml.


What I like: it’s a gel I apply on wet skin and I rub it gently; it makes a delicate foam, very pleasant at touch. I then rinse it with water and my skin feels clean, purified and cleansed. It’s not aggressive at all, I don’t feel my skin dry, it’s soft and smooth and firm. Tea tree is a strong anti-bacterial, I apply it pure on break outs when needed, and this gel seems to prevent break outs which is what I’m looking for.  I use it twice a day and I don’t feel it’s too strong, it keeps shine at bay and my skin feels hydrated at the same time.

What I don’t like: I don’t mind the smell, which is the typical tea tree strong smell, but I’m aware some people might not like it. It vanishes after rinsing the product away, but you can feel it while you’re washing your face. There aren’t micro grains in it so it doesn’t scrub, it’s for a daily use but it might be too light for acne prone skin.

My verdict: for the price point is a winner, I have repurchased it already because it does what it says, I like the feeling on my skin, it’s a very good cleanser!

Italian version:

Ciao fatine,
Usate un detergente viso tutti I giorni? Io sì e, da quando lo faccio, la mia pelle è notevolmente migliorata, aiuta molto le pelli grasse come la mia, ma ce ne sono anche di idratanti per pelli secche, secondo me è un passaggio che non andrebbe saltato a prescindere dalla tipologia di pelle.

Ho scoperto la marca Beauty Formulas su Maquillalia.com ed è così economica che non ho resistito e ho provato diversi prodotti, tra cui il tea tree blemish gel: Gel anti imperfezioni di tea tree. Aiuta a prevenire brufoli, punti neri e sebo in eccesso. Deterge e purifica i pori in profondità. Albero del tè è riconosciuto per le sue proprietà anti-acne e regolatori di grasso. Con questo gel la vostra pelle sarà priva di sebo e pulizia profonda. Prezzo 1.00 per 30 ml.

Cosa mi piace: è un gel che applico sulla pelle bagnata e che poi massaggio delicatamente; si forma una schiuma delicata, piacevole al tatto. Lo risciacquo con acqua tiepida e la pelle risulta pulita, purificata e detersa. Non è assolutamente aggressivo, non sento la pelle secca, è morbida, liscia e compatta. Il tea tree è un efficace anti batterico che applico puro sulle imperfezioni quando serve, e questo gel sembra prevenirle, che è la qualità che cerco. Lo uso due volte al giorno e non mi sembra sia troppo forte, tiene a bada la lucidità e, allo stesso tempo, lascia la pelle idratata.

Cosa non mi piace: l’odore, che è quello tipico del tea tree, a me non dà fastidio ma mi rendo conto che può non piacere. Scompare una volta che si risciacqua il prodotto ma lo si sente mentre lo si massaggia sul viso. Non ci sono micro granuli all’interno quindi non esfolia, è ideale per un uso quotidiano ma potrebbe essere troppo leggero per pelli a tendenza acneica.


Il mio verdetto: per il prezzo che ha è sicuramente promosso, l’ho già riacquistato perché fa quello che dice, mi piace la sensazione che lascia sulla pelle, è un buon detergente!


Monday, 27 November 2017

rainbow hearts nail art

Hi fairies,
If you love colors, rainbows and unicorns you will love this nail art! I first painted all my nails with a pale yellow nail polish (you can use white or any other pastel colors of your choice) and, once it was dry, I painted a tiny heart in a different color on each nail; to shape a heart you just have to draw two lines meeting at the bottom, it’s very easy. With a dotting tool I added colourful dots and That’s it, I hope you like it!

rainbow_hearts_nail_art


rainbow_hearts_nail_art

Italian version:

ciao fatine,
Se amate I colori, gli arcobaleni e gli unicorni, questa nail art vi piacerà moltissimo! Prima ho dato due passate di uno smalto giallo chiaro su tutte le unghie (potete usare il bianco o qualsiasi altra tonalità pastello a vostra scelta) e, una volta asciutto, ho disegnato un cuoricino di un color diverso su ogni unghia; disegnare un cuore è semplice, basta tracciare due linee che si incontrano nella parte bassa. Ho poi aggiunto dei pois colorati con un dotting tool ed È tutto, spero vi piaccia!

rainbow_hearts_nail_art

rainbow_hearts_nail_art

Products used:

kiko nail care 3 in 1 shine fortifying base and top coat

kiko nail polish no 216

kiko power pro nail lacquer no 16

kiko power pro nail lacquer no 32

kiko power pro nail lacquer no 37

kiko power pro nail lacquer no 25


Saturday, 25 November 2017

One product review Kiko cc blur skin trainer

Hi fairies,
I bought this product thinking it was a cc cream but I found out it was a face primer and I was actually happy about it because I’m not really a fan of bb/cc creams but I’m definitely a fan of face primers, they can make a lot of difference on lasting power and opacity!

Let’s see how it’s described: Optical corrector for perfect skin with a smooth, even complexion. Combines a CC cream's skin tone correcting properties with a blur's ability to minimize skin imperfections.
In addition, special ingredients in Skin Trainer CC Blur capture the light which is then reflected on the face for a radiant glow.
The velvety texture is lightly coloured. Available in four shades to meet the needs of all skin tones. Price 29.90 £- € for 30 ml/1.01 fl.oz.

kiko_cc_blur_skin_trainer_review

What I like: when I purchase a primer I look for a perfecting primer that minimizes the appearance of my pores, it evens my skin out, it blurs imperfections out for a “porcelain doll” look and this one does all these things! The consistency is mousse-like, it feels smooth and it’s easy to apply it. It comes in four shades, I’ve got 01 light but in my opinion the color doesn’t show up once it’s evenly applied. I can immediately see my skin blurred out and my pores erased, it prepares my face for makeup and it provides a sticky base that will make my makeup last long. My skin looks even and it prevents my foundation to set into fine lines and to look cakey. it helps foundation not to look patchy and to last longer. To me it’s very comparable to Benefit the Porefessional (here you can read my full review), the consistency, the texture and the performance are the same so I would rather buy this one to save some money, even though the Porefessional is my favorite primer ever, but why spending more?!

What I don’t like: There is silicone in it, you can definitely feel it so if you don’t like the feeling it gives this is not a primer for you. It’s not exactly cheap, it’s almost 20 € so it’s not exactly low cost but, in my opinion, it’s worth the money. I’ve got oily skin and I haven’t experienced any break out using it daily, but I know everyone reacts differently so it might cause that if your skin is sensitive.

My verdict: I love this primer and I will repurchase it for sure, I have already actually, because it’s a bit cheaper than the Porefessional but it performs just as well! It makes my skin look perfect and smooth and it makes my makeup last longer, it does what it says.

Italian version:

Ciao fatine,
Ho comprato questo prodotto pensando che fosse una cc cream ma ho poi scoperto che si trattava di un face primer, e ne sono stata felice perché non sono una fan delle bb/cc cream, ma sono una fan dei primer viso, fanno una grande differenza in termini di durata del trucco e di opacità!
Vediamo come viene descritto: Correttore ottico pelle perfetta, che leviga la grana della pelle e uniforma l’incarnato. Unisce le proprietà di correzione del colorito di una CC Cream, alla capacità di un Blur di minimizzare le imperfezioni cutanee.
Inoltre, grazie a specifici ingredienti nella composizione, Skin Trainer CC Blur contribuisce a catturare la luce, riflettendola sul viso e regalando una radiosità diffusa.
La texture è vellutata e leggermente tonalizzata. Disponibile in 4 colori per rispondere a tutte le tipologie di pelle. Price 29.90 £7-€ for 30 ml/1.01 fl.oz.
kiko_cc_blur_skin_trainer_review

Cosa mi piace: quando acquisto un primer cerco un primer perfezionante che minimizzi l’apparenza dei pori, che uniformi la pelle, elimini le imperfezioni e renda la mia pelle “di porcellana”, e questo prodotto fa tutte queste cose! Ha la consistenza di una mousse, è liscio e facile da applicare. È disponibile in quattro tonalità, io ho scelto la 01 light ma, secondo me, il colore non è praticamente visibile una volta applicato uniformemente. Vedo subito la pelle perfezionata e i pori cancellati quando lo uso, prepara il viso al trucco e fornisce una base leggermente appiccicosa che fa durare il trucco più a lungo. La mia pelle è uniformata e il prodotto impedisce al fondotinta di infilarsi nelle rughette e di risultare pastoso.  Lo aiuta anche a non fare chiazze e a durare di più. A mio parere è paragonabile al the Porefessional di Benefit (qui trovate la mia recensione completa), la consistenza, la finitura e la resa sono le stesse quindi preferisco comprare questo primer e risparmiare qualcosa, anche se il The Porefessional è il mio primer preferito, ma perché spendere di più?

photo by easymakeupbymademoiselleathena.blogspot.com

Cosa non mi piace: contiene silicone, lo si sente distintamente, quindi se non amate questo tipo di primer ve lo sconsiglio. Non è esattamente economico, non lo si può considerare un prodotto low cost visto che viene venduto a 20 € ma , secondo me, vale il prezzo che costa. Io ho la pelle grassa e non ho notato la comparsa di imperfezioni nonostante usi il prodotto quotidianamente, ma sappiamo che ognuno di noi reagisce in modo diverso quindi, se avete la pelle sensibile, potrebbe darvi questo problema.


Il mio verdetto:  è un prodotto che mi piace molto e che ricomprerò sicuramente, anzi a dire il vero l’ho già ricomprato, perché costa un po’ di meno del the Porefessional ma ha la stessa identica resa! Mi perfeziona la pelle, la rende liscia e setosa e fa durare il trucco più a lungo, fa quello che promette.


Friday, 24 November 2017

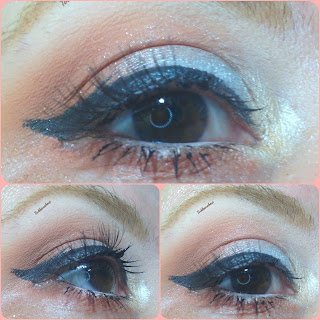
Eye makeup look sparkly fairy wings

Hi fairies,
This look is very simple and on the natural side, there’s just a bit of sparkle going on because I love them and I can’t live without them but, apart of that, it’s a wearable look that reminds me of fairy wings and morning dew!
I started by softly cutting my crease with a matte brown eyeshadow and, once I was happy with the line I traced, I blended it upwards with a small blender brush. Be careful not to bring the color up to the browbone, it’s easy to do that if you use a regular blending brush but, for my experience, with a cut crease is better to use a pencil brush for this purpose. On the inner corner of my lid I applied a shimmery peach eyeshadow, in the middle I chose a frosty baby blue with silver shimmer to it and, in the outer corner, I placed a lilac eyeshadow. I completed the look with a winged liner and mascara, and that was it, I hope you like it!

eye_makeup_look_sparkly_fairy_wings

eye_makeup_look_sparkly_fairy_wings

eye_makeup_look_sparkly_fairy_wings

Italian version:

Ciao fatine,
Questo look è molto semplice e abbastanza naturale, è solo leggermente luminoso perchè io adoro I glitter e non posso vivere senza ma, a parte questo, è un look portabile che mi ricorda le ali delle fate e la rugiada mattutina!
ho iniziato definendo leggermente la piega dell’occhio con un ombretto marrone opaco e, una volta soddisfatta della linea tracciata, l’ho sfumata verso l’alto con un pennello da sfumatura di precisione. Fate attenzione a non portare il colore troppo in alto verso l’arcata sopraccigliare, è facile fare questo errore se usate un classico pennello da sfumatura ma, per la mia esperienza, con una cut crease è meglio usare un pennello penna. Nell’angolo interno della palpebra mobile ho usato un ombretto luminoso color pesca, al centro ho usato un ombretto metallizzato celeste chiaro con riflessi argentati e, nell’angolo esterno, ho scelto un ombretto lilla. Ho completato il look con una riga di eyeliner e del mascara, ed è tutto, spero vi piaccia!

eye_makeup_look_sparkly_fairy_wings

eye_makeup_look_sparkly_fairy_wings

eye_makeup_look_sparkly_fairy_wings

Products used:

lime crime eyeshadow brightener

urban decay eyeshadow in naked 2

urban decay eyeshadow in faint

urban decay eyeshadow in foxy

colourpop powder shadow in 143

sugarpill cosmetics sparkly baby palette eyeshadow kitten parade

sugarpill cosmetics sparkly baby palette eyeshadow candy crush

kiko cosmetics smart eye pencil no 813

kiko ultimate longwear pen liner


kiko overblown mascara

Thursday, 23 November 2017

One product review nyx felt tip liner

Hi fairies,
Eyeliner is one of my must have, I don’t feel my eye makeup is done without it, I like using black one mostly but also colourful ones. I prefer a brush applicator rather than a felt tip liner, but I do try these as well and there are some good ones I purchase over and over. Nyx is a brand I like, most products I’ve tried have impressed me, so I bought their felt tip liner to see if I liked it or not.

Let’s see how it’s described: Our Felt Tip Eye Liner gives you the ultimate control in creating bold and precise lines in 3 opulent shades—extreme black dark brown and jet black. The eye liner marker releases the ideal amount of ink for decidedly dramatic eyes. Price 9.50 $. – 11.00 €.


What I like:  the tip liner is very thin and quite stiff, so it allows to draw a thin line quite easily even if you’re not a pro or you don’t wear eyeliner on a daily basis like I do. It’s pigmented and the color is intense, it’s a nice black that covers any eyeshadows without losing intensity. It doesn’t smudge nor bleed and it stays on pretty much all day, till I remove my makeup.

What I don’t like: the problem I had with this product was it dried out pretty fast, I would say in one month I had to throw it away, which was rather disappointing. I couldn’t use it anymore because there wasn’t any product left and there was no way to get it out. Just before it dried out that it had gotten more and more difficult to draw an even line, it had started to get patchy and I had to push hard to get a decent color pay off. I always stored it upside down like nyx suggests, but to no avail.

My verdict: I won’t repurchase it because I was disappointed at how fast it dried out. It’s not a bad product, but there are definitely better ones on the market.


Italian version:

Ciao fatine,
L’eyeliner è uno dei miei must have, per me il trucco non è completo se non lo uso, di solito uso quello nero ma mi piacciono anche quelli colorati. Preferisco l’applicatore a pennello piuttosto che quello con la punta in feltro, ma provo anche questi ultimi e ne ho ricomprati alcuni più e più volte perché mi ci sono trovata bene. Nyx è un brand che mi piace, quasi tutti i prodotti che ho comprato mi hanno colpito favorevolmente, ecco perché ho deciso di prendere questo e scoprire se mi piacesse oppure no.

Vediamo come viene descritto:  Il nostro Felt Tip Liner ti regala controllo e precisione, per creare tutte le linee che desideri, da quelle più sottili a quelle più intense. Questo marker rilascia solo la quantità esatta di prodotto e lo sguardo diventa magnetico in un secondo. Prezzo 9.50 $- 11.00 €.

Cosa mi piace: la punta è molto sottile e abbastanza rigida, e quindi permette di tracciare una linea sottile anche se non siete esperte o se non usate l’eyeliner tutti i giorni come faccio io. È pigmentato e il colore è pieno, è un bel nero che copre qualsiasi ombretto senza perdere di intensità. Non si sbaffa e non cola, rimane al suo posto per ore, praticamente fino a quando non lo strucco.

Cosa non mi piace: il problema che ho avuto con questo prodotto è stato che si è seccato piuttosto velocemente, praticamente l’ho dovuto buttare dopo circa un mese, e sono rimasta abbastanza delusa. Non riuscivo più ad usarlo perché non c’era più prodotto e non c’era modo di recuperarlo dall’interno. Poco prima che si seccasse completamente era diventato sempre più difficile disegnare una linea omogenea, il colore creava delle macchie e dovevo spingere per avere una resa decente. L’ho sempre tenuto sottosopra come suggerisce Nyx, ma non è servito a niente.


Il mio verdetto:  non lo ricomprerò perché mi ha deluso la velocità con cui si è seccato. Non è un prodotto pessimo, ma ce ne sono decisamente di migliori sul mercato.


Wednesday, 22 November 2017

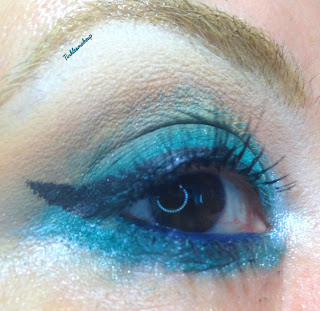
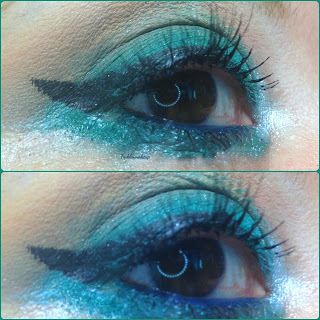
Eye makeup look green blow out

Hi fairies,
I’ve used a sparkly green eyeshadow on my lid for this look, a color I don’t reach for very often because I think it doesn’t really complement my skin tone, but the final result is not bad!
I started by applying a transition color in my crease, which is a matte peach in my case as my skin is very fair, I defused it very well with a blending brush and I added a pinch of orange eyeshadow in the outer half of my crease to give more dimension to the look. With a small blending brush I defined my lower crease with a matte brown eyeshadow. On my lid I patted a sparkly teal pigment being careful not to cover the colors in my crease, and I highlighted my browbone with a matte cream eyeshadow. I completed the look with a winged liner and mascara and that was it, I hope you like it!

eye_makeup_green_blow_out

eye_makeup_green_blow_out

eye_makeup_green_blow_out


Italian version:

Ciao fatine,
Ho usato un ombretto verde con microglitter argento e oro sulla palpebra mobile per questo look, un colore che non uso molto spesso perchè mi sembra che non valorizzi la mia carnagione, ma il risultato finale non è male!
Ho cominciato applicando un colore di transizione nella piega dell’occhio che, nel mio caso è un color pesca opaco visto che ho la pelle molto chiara, e l’ho sfumato molto bene con un pennello da sfumatura; ho aggiunto un pizzico di ombretto arancione nella metà esterna della piega per dare più dimensione al look. Con un pennello piccolo da sfumatura ho definito la parte inferiore della piega usando un ombretto opaco marrone. Sulla palpebra mobile ho picchiettato un pigmento verde azzurro molto luminoso facendo attenzione a non coprire i colori già presenti nella piega, poi ho dato luce all’arcata sopraccigliare con un ombretto opaco color crema. Ho completato il look con una riga di eyeliner e del mascara ed è tutto, spero vi piaccia!

eye_makeup_green_blow_out

eye_makeup_green_blow_out

eye_makeup_green_blow_out


Products used:

lime crime eyeshadow brightener

the balm meet Matt (e) palette Matt Singh

the balm meet Matt (e) palette Matt Lombardi

the balm meet Matt (e) palette Matt Garcia

the balm meet Matt (e) palette Matt Rosen

colourpop powder shadow in wait for it

mac cosmetics loose pigment in teal

the balm meet Matt (e) palette Matt Malloy

kiko cosmetics high tide eye pencil 01

kiko cosmetics ultimate longwear liquid liner

kiko cosmetics overblown mascara

Friday, 17 November 2017

eye makeup look simple silver

Hi fairies,
Let’s start thinking of holiday season’s makeups, it’s never too early, isn’t it? I’ll start with a very simple look, fresh and shiny, perfect for beginners and young girls that want to glam up for holidays but not too much!
I first applied a matte warm medium brown in my crease, mostly in the outer half of it,  and I smoked it out quite a lot; I changed to a small blending brush and I packed the same shade in the very outer corner of my eye to intensify it; on my lid I chose to apply a super sparkly silver pigment, and in the inner corner I used a champagne pigment. I smoked the lower lashline with the brown I previously used, and I completed the look with a winged liner and mascara, and that was it, I hope you like it!


eye_makeup_look_simple_silver

eye_makeup_look_simple_silver

Italian version:

Ciao fatine,
Iniziamo a pensare a dei look per le feste, non è mai troppo presto, giusto? Ho deciso di cominciare con un look semplicissimo, fresco e luminoso, perfetto per le principianti e le giovanissime che vogliono realizzare un trucco diverso per le feste, ma senza esagerare!
Come prima cosa ho applicato un marrone caldo medio nella piega, principalmente nella metà esterna, e l’ho sfumato parecchio; poi ho preso un pennello da sfumatura di precisione e ho concentrato lo stesso colore nell’angolo esterno dell’occhio per dargli profondità; sulla palpebra mobile ho deciso di applicare un pigmento color argento molto luminoso, e nell’angolo interno ho usato un pigmento color champagne. Ho sfumato molto la rima inferiore con lo stesso marrone usato in precedenza, e ho completato il look con una riga di eyeliner e del mascara, ed è tutto, spero vi piaccia!

eye_makeup_look_simple_silver

eye_makeup_look_simple_silver

Products used:

lime crime eyeshadow brightener

jeffree star beauty killer palette Courtney

lime crime venus palette eyeshadow creation

lime crime venus palette eyeshadow aura

about face cosmetics loose pigment in drops of moonlight

jeffree star beauty killer palette China white

kiko kajal kohl pencil no 101

kiko longwear eyeliner pen


kiko overblown mascara

eye_makeup_look_simple_silver

Thursday, 16 November 2017

One product review naturcos ghassoul clay mask

Hi fairies,
I do a face mask once or twice a week and as my skin is oily, I’ve always appreciated green clay masks, mixed with a spoonful of honey or yoghurt, I have actually started taking care of my skin with these masks and they’ve done wonders to keep shine and breakout at bay.
When I saw this clay mask at maquillalia.com I immediately put it in my cart as it had been a while since I had purchased a similar one and I really thought my skin needed it!


Let’s see how it’s described: With Rosehip, Eucalyptus and Orange essential oils. Perfect for damaged skin, this mask is perfect for hydrate the skin and eliminate impurities.
IMPORTANT: This product has a very high absorption capacity, and contain essential oils, which can cause allergies to people sensitive to them. Applying into sensitive skin can cause redness, which disappears after a few hours after the product has been removed. We recommend applying a small amount on the forearm as test before using the product on the face. Price 9.99 €

How I use it and what I think about it: I mix half a teaspoon of clay (it’s a powder) with approximately half a teaspoon of water, or enough water to get a creamy mixture. I apply it evenly on my face using my fingers and I wait for it to dry. The jar might seem small but it will last really long because you just need half a spoon of product and you won’t do it every week, I alternate it with another mask as it’s really strong and drying. It has a very high absorption capacity as it’s stated, it strips your skin of oil so if you don’t have oily skin you shouldn’t use it, it would be too aggressive. It is strong for me as well, even if I have oily skin. If I wait till it’s completely dry my skin looks red after washing it away, but it lasts not more than an hour and then it goes back to normal. It dries breakouts, it cleanse pores and leaves my skin clean, free of impurities. You can mix it with honey, yoghurt or oil to make it less aggressive, keep in mind it’s not for dry skin though.
I recommend it for oily skin, it really works and helps and I will definitely repurchase it!


Italian version:

ciao fatine,
Faccio una maschera viso una o due volte a settimana dato che ho la pelle grassa, mi sono sempre trovata bene con quelle all’argilla verde, mischiate con un cucchiaino di miele o di yogurt, è proprio in questo modo che ho iniziato a prendermi cura della mia pelle e hanno fatto miracoli nel controllare la lucidità e l’insorgere di imperfezioni.
Quando ho visto questa maschera all’argilla su maquillalia.com l’ho subito messa nel carrello perché era da tanto che non ne acquistavo una e mi sembrava proprio che la mia pelle ne avesse bisogno.

Vediamo come viene descritta: con rosa canina, eucalipto e oli essenziali di arancia. Perfetta per pelli danneggiate, questa maschera è ideale per idratare la pelle e eliminare impurità.
IMPORTANTE: questo prodotto ha una grande capacità di assorbimento, e contiene oli essenziali, che possono causare allergie alle persone con pelle delicata. Applicarla su pelle delicata può causare arrossamento, che scompare dopo un paio d’ore da quando il prodotto è stato risciacquato. Si raccomanda di applicarne una piccola quantità sull’avambraccio per testarla prima dell’uso sul viso. Prezzo 9.99 €.


Come la uso e cosa ne penso: mischio mezzo cucchiaino di argilla verde ( in polvere) con circa mezzo cucchiaino d’acqua, o comunque quella necessaria ad ottenere un composto cremoso. Lo stendo uniformemente sul viso con le dita e aspetto che si asciughi. Il vasetto può sembrare piccolo ma durerà molto a lungo perché ne basta poco e perché non è una maschera da fare ogni settimana, io la alterno a una meno aggressiva perché questa secca molto la pelle. Ha una grande capacità di assorbimento, proprio come dice, elimina l’olio dalla pelle e, se avete la pelle secca, sarebbe sicuramente troppo aggressiva. È forte persino per me che ho la pelle grassa. Se aspetto che si asciughi completamente la pelle si arrossa, ma ritorna normale dopo non più di un’ora dal risciacquo. Asciuga le imperfezioni, pulisce i pori e lascia la pelle purificata. La si può mischiare con miele, yogurt o olio per renderla meno aggressiva, ma non dimenticate che non è indicata per le pelli secche.
La consiglio a chi ha la pelle grassa, funziona davvero e io la ricomprerò sicuramente!


Featured post

World of beauty neroli vivace nuova linea / new line

Hi fairies, I’m very pleased to have the chance to try the new Neroli Vivace line by World of beauty and I’m thrilled to talk about it to...