Friday, 27 July 2018

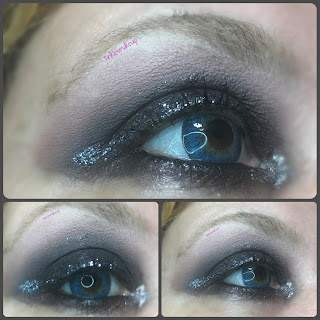
Eye makeup look black glitter


Hi fairies,
It’s been a while since I did a classic, sultry and dark smoky eye and yesterday evening I went to a concert so I thought a dramatic makeup was perfect! I first applied a matte mauve eyeshadow in my crease and I blended it very well to create some depth in my crease and to act as a transition color; I then applied a matte black eyeshadow on my lid and I kept it below my crease because I brought it up blending it little by little. I found it’s better this way, else I end up looking like a panda! As I was going to a concert I could really go dramatic, so I used some gorgeous black glitter to do a winged line that almost covers all my lid; I did a thinner black winged liner and then I added some mascara, and that was it, I hope you like it!


eye_makeup_look_black_glitter

eye_makeup_look_black_glitter

eye_makeup_look_black_glitter

Italian version:

Ciao fatine,
È da un po’ che non faccio un classico, scuro e sensuale smoky eye e, dato che ieri sera sono andata a un concerto ho pensato che un trucco esagerato sarebbe stato perfetto! Come prima cosa ho applicato un ombretto opaco color malva nella piega dell’occhio e l’ho sfumato molto bene per dare un po’ di profondità alla piega e per usarlo come colore di transizione; poi ho applicato un ombretto nero opaco sulla palpebra, tenendolo ben al di sotto della piega perché l’ho poi portato verso l’alto sfumandolo poco alla volta. Ho scoperto che in questo modo mi trovo meglio e evito l’effetto panda! Visto che stavo andando a un concerto potevo davvero esagerare, quindi ho usato dei meravigliosi glitter neri per fare una riga di eyeliner che copriva quasi tutta la palpebra; poi ho disegnato una linea di eyeliner nero più sottile e ho aggiunto del mascara, ed è tutto, spero vi piaccia!

eye_makeup_look_black_glitter

eye_makeup_look_black_glitter

eye_makeup_look_black_glitter

Products used:

nyx cosmetics eye primer proof it!

Nyx cosmetics jumbo eye pencil no 604 in milk

Kiko smart eyeshadow no 13

Urban decay eyeshadow in limit

Urban decay eyeshadow in nooner

Urban decay eyeshadow in blackheart

Kiko precision eye pencil no 600

Mac cosmetics glitter grey

La girl booming lashes mascara

Thursday, 26 July 2018

One product review colourpop ultra blotted lip


Hi fairies,
I really love colourpop liquid lipsticks, so I wanted to try their blotted liptints too,  I was curious about this new product.

Let’s see how they’re described: for that soft, diffused just-blotted look, our medium coverage liquid lipstick dries matte, doesn’t budge, and feels soft and comfy on the lips. Price 6.00 $.

What I like: this liptint is different from any other I’ve tried, the texture is very thin and it doesn’t provide full coverage like traditional liptints, but it applies quite evenly and easily. You can apply two layers where you feel it doesn’t look even and it won’t crack, it’s buildable. It feels comfortable, it doesn’t dry my lips, it doesn’t set into fine lines and it lasts pretty long. As it’s sheer it will look quite good after eating, because you won’t notice a bit of fading in the middle of the lips, which is good. The color shows up even if it’s not as bright and rich as traditional liptints. I like using it when I go for a very natural look, just foundation and eyeliner and mascara: it adds some colors to my lips and it makes them look fuller but it still looks very natural and soft.

colourpop_ultra_blotted_lip_review


What I don’t like:  it dries down fast so you might end up with a streaky application at first, but you just have to get the hang out of it: I apply a thin layer on my lips and then I blot them to evenly distribute the product and, once it’s set, I reapply it when needed. If you coat the doe foot applicator with too much product you might experience a line of product around your lips, it tends to do that, but the trick is to pick just the right amount of product and add it a bit at a time.

My verdict: I like it because it’s something different from traditional lip tints, something perfect for everyday makeup and to add a touch of color without being too much.

photo from http://kayxcake.blogspot.com

Italian version:

Ciao fatine,
Mi piacciono molto le tinte labbra Colourpop e per questo ho voluto provare anche le loro Ultra blotted lip, ero curiosa di scoprire questo nuovo prodotto.

Vediamo come vengono descritte: per ottenere quel look delicato, sfumato e appena tamponate, i nostri rossetti liquidi a media coprenza si asciugano e diventano opachi, non sbavano, e rimangono morbidi e non seccano le labbra. Prezzo 6.00 $.

colourpop_ultra_blotted_lip_review

Cosa mi piace: questa tinta labbra è diversa da tutte le altre che ho provato, la consistenza è molto sottile e non copre completamente come le tinte labbra tradizionali, ma si applica abbastanza facilmente e in modo omogeneo. Se ne possono applicare due strati dove ritenete che non sia stato steso in modo omogeneo e non si formeranno crepe, è modulabile. È confortevole, non secca le labbra, non si infila nelle pieghette e dura abbastanza a lungo. Non essendo un colore pieno, sarà ancora in buono stato dopo i pasti perché non si noterà c he è leggermente sbiadito al centro delle labbra, il che è positivo. Il colore è visibile anche se non è così intenso come quello delle tradizionali tinte labbra. Mi piace usarlo quando opto per un look molto naturale e uso solo fondotinta, eyeliner e mascara: dà un po’ di colore alle labbra e le rende più piene ma rimane comunque molto naturale e delicato.


Cosa non mi piace: si asciuga velocemente quindi potreste ritrovarvi con un’applicazione poco omogenea all’inizio, ma dovete solo prenderci la mano: io ne applico uno strato sottile e poi unisco le labbra per distribuirlo uniformemente e, quando è asciutto, lo vado a riapplicare dove serve. Se prelevate troppo prodotto sull’applicatore vi ritroverete con una linea di prodotto intorno alle labbra, tende a farlo, ma il trucco è quello di prelevarne poco e di aggiungerlo poco alla volta.

Il mio verdetto: mi piace perché è diverso dalle tradizionali tinte labbra, è perfetto per tutti i giorni e per dare colore alle labbra senza essere eccessivo.


Monday, 23 July 2018

One product review: bio oil


Hi fairies,
I like body oils because they keep my skin soft and smooth, I use them all year round, even when it’s hot: I apply them after showering and they usually get absorbed pretty fast. I prefer scented ones, fruity or foodie, but I use scented free ones as well.
I’ve heard so much about bio oil, both good and bad, that I had to try it myself!
It’s known to help with scars and stretch marks, that’s what the website says: Scars are an integral part of the healing process and result from an overproduction of collagen at the wound site. Scars go through numerous changes as they mature, but they are permanent in nature. Bio-Oil is formulated to help improve the appearance of scars, but it can never remove them. The Bio-Oil formulation is a combination of plant extracts and vitamins suspended in an oil base. It contains the breakthrough ingredient PurCellin Oil™, which changes the formulation’s overall consistency, making it light and non-greasy, ensuring that the goodness contained in the vitamins and plant extracts is easily absorbed.


my opinion: I know many people say ingredients are far from being bio and they claim its name is deceiving, which could be true as there are many people who don’t know anything about this product and they will think it’s bio as it’s called bio oil. It can be deceiving, but I think it’s important to check ingredients when we look for a bio or organic product, it doesn’t take much to do that. As for the oil itself I like it because it gets absorbed fast, it doesn’t feel greasy, my skin feels soft , smooth and moisturized all day. I use it in summer as well, it’s one of my favorite when it’s hot because of what I’ve just said. I don’t have many stretch marks so I can’t tell if it helps with their appearance, but it minimizes scars and it makes them heal faster. The scent is very light and pleasant, you’ll like it if you’re not looking for a strong scent. It seems to me my skin is firmer when I use it so I guess it prevents stretch marks when you’re pregnant and in general.
To me it’s a good body oil and I will definitely repurchase it, it’s not bio but it’s not a priority to me so it’s okay!


Italian version:

Ciao fatine,
Mi piacciono gli oli corpo perchè lasciano la pelle morbida e vellutata, e li uso durante tutto l’anno, anche quando fa caldo: di solito li applico dopo la doccia e si assorbono piuttosto velocemente. Preferisco quelli con profumazioni fruttate o di dolci, ma uso anche quelli privi di fragranza.
Ho sentito talmente tanto parlare del bio oil, sia positivamente che negativamente, che ho deciso di provarlo!
È famoso per l’aiuto che dà con le cicatrici e le smagliature, vediamo cosa viene detto sul sito:Le cicatrici sono parte integrante del processo di riparazione e sono il risultato di un’eccessiva produzione di collagene nel tessuto leso. Le cicatrici subiscono vari cambiamenti nell’aspetto man mano che maturano, ma sono permanenti. Bio-Oil è formulato per aiutare a migliorare l’aspetto delle cicatrici pur non rimuovendole definitivamente. La formulazione di Bio-Oil è una combinazione di estratti di piante e vitamine sospese in una base oleosa. Contiene l’innovativo ingrediente PurCellin Oil™, che modifica la consistenza complessiva della formulazione, rendendola leggera e non grassa e assicurando che i principi attivi, contenuti nelle vitamine e nelle piante, siano facilmente assorbibili.


La mia opinione: so che molte persone dicono che gli ingredienti sono ben lontani dall’essere bio e sostengono che il nome può essere ingannevole, cosa probabilmente vera visto che molti non conoscono bene questo prodotto e penseranno che sia bio visto che la parola è riportata nel nome stesso. Può trarre in inganno, ma credo sia importante controllare gli ingredienti quando cerchiamo un prodotto bio o naturale, non ci vuole molto tempo per farlo. Per quel che riguarda l’olio, a me piace perché si assorbe rapidamente, non unge, lascia la pelle morbida , vellutata e idratata tutto il giorno. Lo uso anche d’estate, è uno dei miei preferiti quando fa caldo per le ragioni che ho appena elencato. Non ho molte smagliature quindi non so dire se le attenui, ma attenua le cicatrici e le fa guarire più velocemente. Ha un profumo delicato e piacevole che sarà gradito a chi non ama le profumazioni troppo intense. Ame sembra che la pelle sia più compatta quando lo uso quindi, secondo me, aiuta la formazione delle smagliature quando si è incinta e in generale.
Per me è un buon olio corpo e lo riacquisterò sicuramente, non è bio ma per me questa non è una priorità quindi va bene lo stesso!


Saturday, 21 July 2018

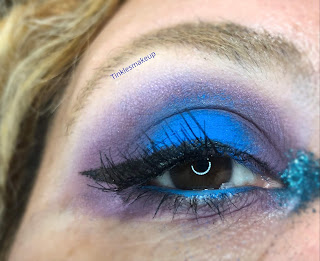
Eye makeup look: purple sandwich


Hi fairies,
Today I’ve tried the color combo purple/blue and here’s the result! I like it, to me the key is to pick a purple with warm undertones else the look would be too harsh. This way colors melt into each other really well and there’s a nice balance between warm and cold shades.
I’ve started by applying a light matte lavender eyeshadow in my crease as a transition color, I also added a bit of a mauve eyeshadow to give more dimension to the crease. I used an intense purple eyeshadow in the inner and outer corner of my eye and I blended the edges being careful not to cover the color in the crease. In the middle of my lid I applied a vivid sky blue and I blended where the two colors met. In the inner corner I added some glitters for extra sparkles, and I completed the look with a winged liner and some mascara and that was it, I hope you like it!

eye_makeup_looK_purple_sandwich

eye_makeup_looK_purple_sandwich


Italian version:

Ciao fatine,
Oggi ho provato la combinazione viola/azzurro e questo è il risultato! A me piace, credo che il segreto sia di usare un viola con sottotono caldo altrimenti il look risulterebbe troppo intenso. In questo modo i colori si fondono l’uno nell’altro e si crea un equilibrio fra toni caldi e toni freddi.
Ho cominciato applicando un ombretto opaco color lavanda nella piega dell’occhio come colore di transizione, e ho anche aggiunto un pizzico di ombretto color malva per dare più profondità alla piega. Ho usato un intenso ombretto viola nell’angolo interno ed esterno dell’occhio e ne ho sfumato i contorni facendo attenzione a non coprire quelli già presenti nella piega. Al centro della palpebra ho applicato un ombretto azzurro molto acceso e ho sfumato dove i due colori si incontravano. Nell’angolo interno dell’occhio ho aggiunto dei glitter per un effetto super luminoso, e ho completato il look con una riga di eyeliner e del mascara, ed è tutto, spero vi piaccia!

eye_makeup_looK_purple_sandwich

eye_makeup_looK_purple_sandwich


Products used:

nyx eye primer proof it!

Kiko cosmetics long lasting stick shadow no 31

Shu uemura mono eyeshadow M751

Colourpop cosmetics powder shadow silver lining

Colourpop cosmetics powder shadow free of care

Urban decay electric palette pressed pigment in gonzo

Kiko cosmetics smart eyeshadow no 10

Kiko bright duo eyeshadow no 12

Kiko kajal kohl pencil no 110

Kiko fine line pen liner

Sephora glittering eye duo no 01 aqua

La girl booming lashes mascara


Friday, 20 July 2018

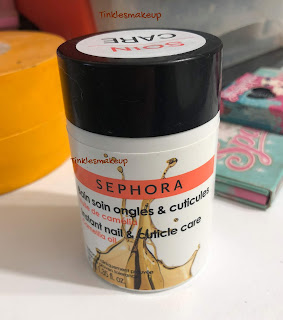
One product review Sephora instant nail & cuticle care treatment


Hi fairies,
Do you use any cuticle oil? I admit I don’t use it everyday but I find that keeping the oil on my desk helps, I can see it and I use it more often and my nails are grateful for that!

sephora_instant_nail_cuticle_care_review
One of my favorite nail and cuticle oil is Sephora’s , which is described as follows: Achieve healthier and stronger nails from just a quick one-minute dip into the foam. Price 8.90 €.
It’s a plastic container with a lid and, when you open it, you dip your fingers, one by one, in the sponge dipped with oil. It’s very easy to use, there’s no oil spilling and no waste of product. The sponge is really soaked up with oil and it stays that way for months, it doesn’t get dry at all! I’ve been using it for at least four months and there’s still lots of product. It’s got a light, delicate flowery smell that doesn’t bother me at all. It helps with nail growth when used constantly, I was really impressed because I didn’t expect to see any difference, I just thought it would have kept my cuticles soft and it would have nourished my nails, but it actually works!

sephora_instant_nail_cuticle_care_review

The only downside is you get your fingertips oiled too and you have to clean them if you don’t want to leave greasy fingertips everywhere!
I already repurchased it, it’s a good nail oil and it doesn’t cost a fortune considering how long it lasts!

sephora_instant_nail_cuticle_care_review

Italian version:

Ciao fatine,
Voi usate dell’olio per cuticole? Ammetto che non lo uso tutti i giorni ma ho scoperto che tenerlo sulla scrivania mi aiuta, perché lo vedo e lo uso più spesso e le mie unghie me ne sono grate!
Uno dei miei oli preferiti è quello di Sephora, che viene descritto così: unghie più sane e forti immergendole velocemente nella spugna per solo un minuto. Prezzo 8.90 €
È un contenitore di plastica con un tappo e, quando lo si apre, si immergono le dita, una ad una, nella spugna imbevuta d’olio. È molto facile da usare, l’olio non si versa e non c’è spreco di prodotto. La spugna è molto imbevuta di prodotto e rimane tale per mesi, non si secca assolutamente! Io lo sto usando da almeno quattro mesi e c’è ancora tantissimo prodotto. Ha un profumo floreale e delicato che a me non da assolutamente fastidio. Se usato costantemente aiuta con la crescita delle unghie, ne sono rimasta molto colpita perché non mi aspettavo che facesse alcuna differenza, pensavo solo che ammorbidisse le cuticole e rinforzasse le unghie, invece funziona davvero!

sephora_instant_nail_cuticle_care_review

L’unico lato negativo è che si ungono anche i polpastrelli che vanno, quindi, puliti se non volete lasciare impronte unte ovunque!
Io l’ho già ricomprato, è un buon olio per unghie e non costa una fortuna, soprattutto considerando che dura veramente a lungo!


Wednesday, 18 July 2018

eye makeup look : liquid metal


Hi fairies,
Here I am with a warm eye makeup, and I have to say it doesn’t look that bad! This season metallic eyeshadows are so trendy, so I used them in this look, which is very bold and dramatic!
I started by applying a matte pink mauve in the crease and I defused it very well; I then gave more depth to the crease by applying a caramel eyeshadow over my transition color, using a precision blending brush.
In the inner corner I used a shimmery silver eyeshadow and I didn’t blend it upwards, I actually cut my crease because I wanted a defined look; in the middle of my lid I applied a vibrant copper shade, and in the outer corner I applied a shimmery brown chocolate eyeshadow. I completed the look with a winged liner and mascara, and that was it, I hope you like it!

eye_makeup_look_liquid_metal

eye_makeup_look_liquid_metal

eye_makeup_look_liquid_metal


Italian version:

Ciao fatine,
Eccomi con un makeup caldo, e devo dire che non è poi così male! In questo periodo vanno molto gli ombretti metallici, così ho voluto usarli per questo look, che è molto intenso e drammatico!
ho iniziato applicando un malva rosato opaco nella piega e sfumandolo molto bene; poi ho dato più profondità alla piega applicando un ombretto color caramello sopra il colore di transizione usando un pennello da sfumatura di precisione.
Nell’angolo interno ho usato un ombretto luminoso color argento e non l’ho sfumato verso l’alto, anzi ho definito la piega dell’occhio perché volevo una cut crease; al centro della palpebra ho applicato una tonalità rame molto intensa, e nell’angolo esterno ho usato un ombretto luminoso marrone cioccolato. Ho completato il look con una riga di eyeliner e del mascara, ed è tutto, spero vi piaccia!

eye_makeup_look_liquid_metal

eye_makeup_look_liquid_metal

eye_makeup_look_liquid_metal

Products used:

lime crime eyeshadow brightener

urban decay naked 3 palette nooner

urban decay naked 3 palette strange

urban decay naked 3 palette limit

kiko cult eyeshadow palette shimmer no 02

kiko cult eyeshadow palette shimmer no 03

kiko cult eyeshadow palette shimmer no 10

kiko kajal kohl pencil no 101

kiko fine line eyeliner

kiko overblown mascara


Tuesday, 17 July 2018

Cute butterfly nail art


Hi fairies,
In spring butterflies are flying around with their colourful wings, they are so beautiful and magical, aren’t they?!
Butterflies are one of my favorite nail art subjects because they are relatively easy to do, there are endless ways to draw them and they just look good!
This time I chose a light blue as my background color and I added some white dots on the tips of my nails, then I started drawing my butterflies: I used pink to draw the wing’s shape, then I filled it in with blue and I added some white details. I outlined the wings with black and I added its body and antennas, and that was it, I hope you like it!

cute_butterfly_nail_art

Italian version:

Ciao fatine,
In primavera le farfalle volano nell’aria con le loro ali colorate, sono così belle e magiche, non trovate?
Le farfalle sono uno dei miei soggetti preferiti per la nail art perché sono relativamente facili da realizzare ,ci sono tantissimi modi di disegnarle e il risultato è sempre gradevole!
Questa volta ho scelto un celeste chiaro come colore di sfondo e ho aggiunto dei pois bianchi sulla punta delle unghie, poi ho cominciato a disegnare le farfalle: ho usato il rosa per disegnare la sagoma delle ali, poi l’ho riempita di azzurro e ho aggiunto qualche dettaglio usando il bianco. Ho contornato le ali di nero e ho disegnato anche il corpo e le antenne della farfalla, ed è tutto, spero vi piaccia!

cute_butterfly_nail_art

Products used:

essie ridge filling base coat

kiko nails care gel effect top coat

kiko nail polish no 525

kiko nail polish no 337

kiko power pro nail polish no 13

Americana acrylic paint in white and black

cute_butterfly_nail_art


Monday, 16 July 2018

One product review nyx faux whites eye brightener pencils


Hi fairies,
I’m definitely a fan of white eye pencil in the water line, I’ve been using it since I was a teen and I’ve switched to colourful ones only in the last few years, white one has been my go to since forever! It opens up my eye and it brightens it up unlike dark ones.  I don’t like black eye pencil in my waterline and I never wear it, I know I’m weird!

I think this nyx line is quite innovative, there are white eye pencils with a slight colourful hue, I actually want them all! Let’s see how they’re described: Brighten up those beautiful eyes! Our all-new collection of Faux Whites features a variety of white liners with an exquisite hint of color—from blush, to lavender, and mint. This bouquet of tones may be delicate, yet each one is anything but subtle. Every color glides on velvety-soft and provides a striking matte finish. Pencil the corners of the eyes using these vibrant brighteners for a fresh highlight. Price 8.00 $.


What I like: an issue I often find with white eye pencils is they don’t write as much as I’d like to, but this one does, it actually is very pigmented and waxy, perfect to trace a neat line in my waterline without needing to go over it several times, which is quite uncomfortable as the waterline is a sensitive area. The consistency is just the right one, some eye pencils are really hard and you have to press too much but that’s not the case. The color is intense and you can definitely see the light blue hue (that’s the one I own), the result very pretty and flattering. It’s quite long lasting, about 4-5 hours, it doesn’t smudge and it holds on quite well. It’s easy to sharpen which is always a plus.

What I don’t like: they haven’t any cons in my opinion, if you don’t like wearing light eye pencils in the waterline you won’t like them but it’s just a matter of personal preference.

My verdict: as I said I want to buy more colors, especially lavender and green mint, I really like them, they’re long lasting and pigmented and not too expensive.


Italian version:

Ciao fatine,
Sono sicuramente una fan della matita bianca nella rima interna dell’occhio, la uso da quando ero un’ adolescente e solo negli ultimi anni sono passata alle matite colorate, quella bianca è stata la mia matita passepartout da sempre! Mi apre lo sguardo e lo illumina, al contrario di quelle scure. Non mi piace la matita nera nella rima interna e non la uso mai, sono strana, lo so!
Credo che questa linea di nyx sia innovativa, si tratta di matite per occhi bianchi con una leggera nota di colore, a dire il vero le voglio tutte! Vediamo come vengono descritte: Illumina i tuoi occhi con la nuova collezione di Faux Whites, dai toni chiari e brillanti. Bianco, lavanda e menta sono solo alcuni dei delicati colori dal finish matte che - con un semplice tocco - doneranno luce ai vostri sguardi! Prezzo 6.90 €.

Cosa mi piace: un problema che riscontro spesso nelle matite occhi è che non sono scriventi come vorrei, ma questa lo è, è molto pigmentata e ha una consistenza cerosa che è perfetta per tracciare una linea marcata all’interno dell’occhio senza doverla ripassare più e più volte, cosa abbastanza fastidiosa visto che si tratta di una zona molto delicata. Ha la giusta consistenza, alcune matite occhi hanno la mina molto dura e bisogna spingere molto, ma questa no. Il colore è intenso e si vede chiaramente l’azzurro pallido (che è quella che io possiedo), il risultato è molto carino. Ha una buona durata, circa 4-5 ore, non sbava e si comporta piuttosto bene. È facile da temperare, il che è sempre un vantaggio.

Cosa non mi piace: secondo me non hanno difetti, se non vi piace usare matite chiare nella rima interna non vi piaceranno, ma è questione di gusto personale.

photo from http://missstephanieusher.blogspot.com/

Il mio verdetto: come vi dicevo voglio comprare altre tonalità, in particolare il lavanda e il verde menta, mi piacciono molto, sono pigmentate, hanno una buona durata e non costano troppo.


Friday, 13 July 2018

Eye makeup look mossy green


Hi fairies,
For this look I’ve used different shades of green and a bit of dark grey, it’s basically a green smoky eye; I first blended a light taupe in the crease to help shadows apply smoothly, and then I started applying a light green with a blending brush, which was my transition color. On the lid I applied a mossy green eyeshadow and I blended the edges in the lighter green to create a gradient. I thought the look was overall too dark, so I patted a bright green pigment in the centre of my lid to add some light. In the outer corner I applied a dark grey eyeshadow and I blended it very well.  I completed the look with a winged liner and mascara, and that was it, I hope you like it!


Italian version:

Ciao fatine,
Per questo look ho usato diverse tonalità di verde e un pizzico di grigio scuro, si tratta praticamente di uno smokey eye verde; come prima cosa ho sfumato un ombretto color talpa chiaro per aiutare gli altri ombretti a essere sfumati meglio, e poi ho cominciato ad applicare un verde chiaro con un pennello da sfumatura, come colore di transizione. Sulla palpebra ho usato un ombretto verde bosco, e ne ho sfumato i contorni nel verde chiaro per creare una sfumatura. Mi sembrava che il look fosse troppo scuro nell’insieme, così ho picchiettato un ombretto verde luminoso al centro della palpebra per aggiungere un po’ di luce. Nell’angolo esterno dell’occhio ho aggiunto un ombretto grigio scuro che ho poi sfumato molto bene. Ho completato il look con una riga di eyeliner e del mascara, ed è tutto, spero vi piaccia!


Products used:

nyx cosmetics eyeshadow primer proof it!

Nyx cosmetics jumbo eye pencil no 604 in milk

Kiko smart eyeshadow no 28

Sugarpill cosmetics loose pigment in tipsy

Kiko loose pigment shadow no 14

Kiko smart eyeshadow no 10

Kiko infinity eyeshadow no 289

Kiko infinity eyeshadow no 218

Kiko super color liner no 104

La girl booming lashes mascara


Featured post

World of beauty neroli vivace nuova linea / new line

Hi fairies, I’m very pleased to have the chance to try the new Neroli Vivace line by World of beauty and I’m thrilled to talk about it to...