Monday, 30 September 2019

Black and white stripes nail art


Hi fairies,
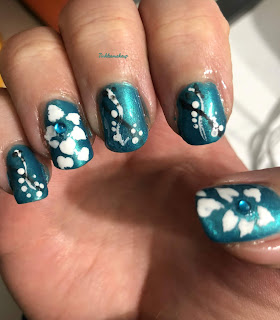
For this nail art I picked a teal as a background color, but you can pick any colors of your choice. Once it was dry I used a striping brush to draw some curve lines in black and white crossing eachother; on the side of the white line I painted some white dots and on the side of the black line I added some black dots.
On my ring finger and thumb I painted a white five petal flower and I placed a rhinestone in the middle, and that was it, I hope you like it!


black_and_white_stripes_nailart

Italian version:

Ciao fatine,
Per questa nail art ho scelto un colore ottanio per lo sfondo, ma potete usare qualsiasi colore preferiate. Una volta asciutto ho usato uno striping brush per disegnare delle linee curve in bianco e nero che si incrociano fra di loro; sul lato della linea bianca ho aggiunto dei pois bianchi, mentre sul lato della linea nera ho aggiunto dei pois neri.
Sull’anulare e sul pollice ho disegnato un fiore bianco a cinque petali e ho aggiunto un cristallo al centro, ed è tutto, spero vi piaccia!

black_and_white_stripes_nailart

Products used:

kiko nail care 3 in 1 shine fortifying base and top coat

essie nail lacquer take me to thread

essence nail polish cubanita no 04

Americana acrylic paint in black and white

black_and_white_stripes_nailart


Tuesday, 24 September 2019

Lavender nail art


Hi fairies,
I really love lavender fields, they’re so magical and they smell so good, have you ever seen photos of them? I think they’re breathtakingly beautiful and I decided to paint some lavender on my nails.
I used semi permanent nail polish, I’ve started using it few months ago and I still have lots to learn but right now I’m happy with my results because my mani lasts 20 days and it’s life changing! So far I’ve learned to apply very thin layers of nail polish and  to prep my nails else it doesn’t stick properly. I cure each layer for 90 seconds.
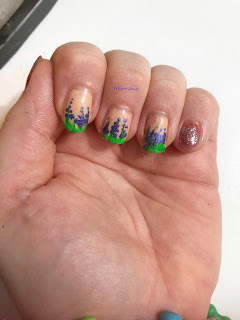
For this mani I applied a skin color nail polish on my index, middle and ring finger and a brick red one on my thumb and pinkie finger. I topped the brick red with silver glitter, while I painted some lavender on the skin color base and that was it, I hope you like it!

lavender_nail_art


Italian version:

Ciao fatine,
Mi piacciono molto I campi di lavanda, sono magici e hanno un profumo inebriante, avete mai visto delle foto? Credo che siano di una bellezza mozzafiato e così ho deciso di dipingere della lavanda sulle mie unghie.
Ho usato smalto semi permanente, ho cominciato a usarlo qualche mese fa e ho ancora molto da imparare ma al momento sono soddisfatta dei risultati perché la mia manicure dura circa 20 giorni e questo cambia la vita! Finora ho imparato ad applicare strati di smalto molto sottili e a preparare le unghie altrimenti lo smalto non aderisce bene. Fisso ogni strato sotto la lampada UV per 90 secondi.
Per questo disegno ho applicato uno smalto color carne sull’indice, medio e anulare, e uno rosso mattone sul pollice e sul mignolo. Ho aggiunto uno strato di glitter argento sullo smalto rosso mattone, mentre ho disegnato degli steli di lavanda sullo sfondo color carne, ed è tutto, spero vi piaccia!
lavender_nail_art

lavender_nail_art


Monday, 23 September 2019

One product review models own tea tree concealer


Hi fairies,
I purchase Models Own products on Maquillalia, I don’t think they can be found in Italian shops, I’ve only seen the brand in England. It’s not easy to find the right concealer shade without swatching them, but I usually go for the lightest one and it usually matches my skin tone as I’m very pale. You could look for online swatches to get the right shade, in case you’d like to try this concealer or any other brands not available in shops.

Let’s see how it’s described: Tea Tree Healer Concealer - Start two-timing with this Models Own Tea Tree Healer Concealer. With tea tree oil for tackling blemishes, this multitasking stick works hard and plays harder.


What I like: it’s a lightweight concealer perfect to brighten up the under eye area without looking cakey. I don’t have deep dark circles so a pea size amount of this product is enough to even out my skin and make me look fresh and awake. I set it with powder, I do that with every concealer, and it doesn’t crease, which is what I hate the most about concealers, and it stays put all day. It doesn’t dry my skin. It’s easy to apply, it doesn’t set too fast but it gives you time to blend it with a brush or a beauty blender. It conceals break outs as well and, as it’s infused with tea tree, it helps dry them and I love that!

What I don’t like: I think it’s a good concealer if you don’t have too many blemishes or discoloration, it’s light to medium coverage so it won’t cover up acne scars or huge break outs. In my opinion it’s not good for dry skin because tea tree oil is drying.

My verdict: for the price point is a good concealer, I like that there’s tea tree oil in it because it really helps with break outs, it doesn’t look cakey but it provides the coverage I’m looking for.


Italian version:

Ciao fatine,
Compro I prodotti Models Own su Maquillalia, non credo si trovino nei negozi italiani, li ho visti solo in Inghilterra. Non è facile trovare la giusta tonalità di correttore quando non si ha la possibilità di provarli, ma io di solito prendo la più chiara e, in genere, è quella giusta perché sono molto pallida. Per trovare il colore giusto per voi potete cercare online le foto di swatches su diverse tonalità di pelle, nel caso in cui vogliate provare un correttore che non sia disponibile nei negozi.

Vediamo come viene descritto il prodotto: Correttore al Tea Tree- comincia a fare il doppio gioco con il correttore Tea Tree Healer di Models Own. Con l’olio di melaleuca al suo interno per contrastare le imperfezioni,  questo stick multifunzione lavora duro e fa un gioco ancora più duro.

photo by stacysbeautyblog.wordrpress.com

Cosa mi piace: è un correttore dalla consistenza leggera perfetto per illuminare la zona del contorno occhi senza appesantirla. Io non ho occhiaie marcate quindi me ne basta una piccola quantità per rendere l’incarnato omogeneo e darmi un aspetto fresco e riposato. Lo fisso con della cipria, cosa che faccio con tutti i correttori, e non va ad enfatizzare le rughette, che è ciò che odio di più nei correttori, e rimane al suo posto tutto il giorno. Non mi secca la pelle. È facile da applicare, non si secca tanto velocemente da non permetterne la stesura con un pennello o con la beauty blender. Copre anche le imperfezioni e, contenendo olio di melaleuca, aiuta a seccarle velocemente e lo adoro per questo!

Cosa non mi piace: penso che sia un buon correttore se non si hanno troppe imperfezioni o iperpigmentazione, la coprenza va da leggera a media quindi non maschererà cicatrici acneiche o imperfezioni pronunciate. Secondo me non è adatto a chi ha la pelle secca perché l’olio di melaleuca tende a seccare.


photo by stacysbeautyblog.wordrpress.com

Il mio verdetto: è un buon correttore per il prezzo che ha, mi piace il fatto che contenga olio di melaleuca perché è efficace contro le imperfezioni, non è pesante ma mi garantisce la coprenza che cerco!


Tuesday, 17 September 2019

Eye makeup look soft lilac


Hi fairies,
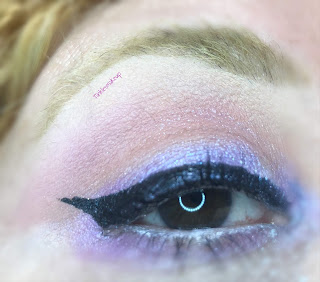
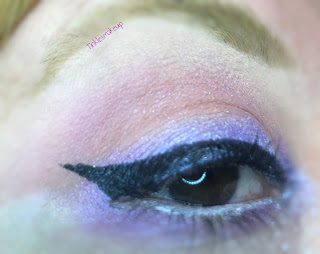
Sometimes I’m all for simple and quick makeup looks, especially when  it’s too hot to spend one hour doing my eye makeup and I need something light and easy to wear everyday or when I don’t have much time! I like using pastel shades as they look good on my complexion, so today I used a pastel lavender as the main color of this look. I first applied a skin tone eyeshadow all over my lid to help blending the eyeshadows I was going to apply, and then I applied a light mauve eyeshadow in the crease as my transition color. On the lid I applied a beautiful pastel lavender eyeshadow and I blended it upwards. In my inner corner I placed a silver eyeshadow with light blue undertones, and  I completed the look with a winged liner and mascara, and that was it, I hope you like it!

eye_makeup_look_soft_lilac

eye_makeup_look_soft_lilac

eye_makeup_look_soft_lilac

Italian version:

Ciao fatine,
A volte preferisco makeup semplici e veloci, quando fa troppo caldo per passare un’ora a realizzare il trucco occhi, ho bisogno di qualcosa di leggero e facile da fare, adatto per tutti I giorni, oppure quando ho poco tempo! Mi piace usare colori pastello perché stanno bene con la mia carnagione, quindi oggi ho usato un color lavanda pastello come tonalità principale di questo look. Prima ho applicato un ombretto color carne su tutta la palpebra per facilitare la sfumatura degli ombretti che avrei applicato successivamente, e poi ho applicato un ombretto opaco color malva nella piega come colore di transizione. Sulla palpebra mobile ho applicato un bell’ombretto color lavanda pastello e l’ho sfumato verso l’alto. Nell’angolo interno dell’occhio ho usato un ombretto argentato con riflessi celesti, e ho completato il look con una riga di eyeliner e del mascara, ed è tutto, spero vi piaccia!


eye_makeup_look_soft_lilac

eye_makeup_look_soft_lilac

eye_makeup_look_soft_lilac


Products used:

nyx cosmetics proof it! Eye primer

nyx cosmetics jumbo eye pencil no 604 in milk

urban decay eyeshadow foxy

jeffree star cosmetics beauty killer palette eyeshadow Courtney

jeffree star cosmetics beauty killer palette eyeshadow princess

jeffree star cosmetics beauty killer palette eyeshadow china white

about face loose pigment in risky behaviour

September rose cosmetics slush palette eyeshadow in berry blast

September rose cosmetics slush palette eyeshadow in bubblegum

Nyx cosmetics epic ink liner

La girl booming lashes mascara


Monday, 16 September 2019

Unicorn nail art


Hi fairies,

Do you believe in unicorns? I do, I believe in magic, fairies and unicorns! When we believe in magic, magic will happen in our life…have you ever thought of someone and the phone rang and it was the one you were thinking of? That’s magic!
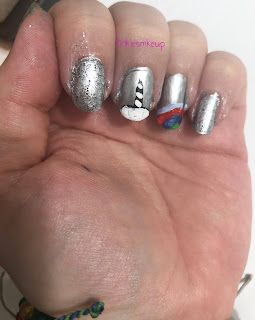
Unicorns are so magical, they make me happy, that’s why I did this nail art inspired by unicorns. It’s very easy, I painted my nails with a metallic silver nail polish and I added a coat of silver glitter nail polish on my nails apart from my middle and ring finger.
On my middle finger I painted a unicorn’s horn, while on my ring finger I painted colourful stripes that represented a unicorn’s tail and mane, and that was it, I hope you like it!


unicorn_nail_art


unicorn_nail_art

Italian version:


Ciao fatine,
Credete negli unicorni? Io si, credo nella magia, nelle fate e negli unicorni! Quando crediamo nella magia, la magia si presenta nelle nostre vite…vi è mai successo di pensare a qualcuno e in quel momento squillava il telefono ed era la persona a cui stavate pensando? Questa è magia!
Gli unicorni sono così magici, mi rendono felice, ecco perché ho realizzato questa nail art ispirata agli unicorni. È molto facile, ho usato uno smalto argentato dalla finitura metallica su tutte le unghie e poi ho aggiunto una passata di uno smalto con glitter argentati su tutte le unghie tranne che sul medio e sull’anulare.
Sul medio ho disegnato il corno di un unicorno, mentre sull’anulare ho disegnato delle righe colorate che rappresentano la coda e la criniera dell’unicorno, ed è tutto, spero vi piaccia!

unicorn_nail_art

Products used:

essie nail polish ridge filler base coat

kiko nail polish fast & dry base and top coat

models own nail polish chrome silver np 239

kiko nail polish arctic holiday no 004

Americana acrylic paint in white, red, blue, green

unicorn_nail_art

Thursday, 12 September 2019

Eye makeup look flowery lime and green - Inside out Disney inspired-


Hi fairies,
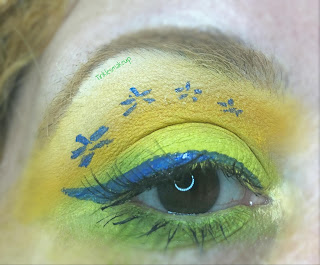
Last night I watched the movie Inside out, I’m a Disney movie addict, and Joy inspired me this look: in my crease I blended a matte yellow with a fluffy blending brush and I added a tiny bit of a lighter yellow around the edges to create a gradient. On my lid I used a matte lime eyeshadow and I was careful not to overlap the yellow but I blended where the two colors met. In the outer corner of my eye I used a grass green eyeshadow. I drew some simple blue flowers following the shape of my crease, and I completed the look with blue eyeliner and mascara, and that was it, I Hope you like it!

flowery_lime_and_green_makeup

flowery_lime_and_green_makeup

flowery_lime_and_green_makeup


Italian version:

Ciao fatine,
Ieri sera ho guardato il film Inside out, io sono appassionata di film Disney, e Joy mi ha ispirato per questo look: nella piega dell’occhio ho sfumato un ombretto opaco giallo con un pennello largo da sfumatura, e ho aggiunto un pizzico di un giallo più chiaro sui contorni per creare una sfumatura omogenea. Sulla palpebra ho usato un ombretto opaco color lime cercando di non andare sopra al giallo ma sfumando i due colori la dove si incontravano. Nell’angolo esterno dell’occhio ho aggiunto un ombretto verde prato per dare più dimensione al look. Ho disegnato dei semplici fiorellini blu seguendo la linea della piega dell’occhio, e ho completato il look con dell’eyeliner blu e del mascara, ed è tutto, spero vi piaccia!


flowery_lime_and_green_makeup

flowery_lime_and_green_makeup

flowery_lime_and_green_makeup


Products used:

essence I love stage eye primer

revolution pro pigment pomade in lemon yellow

kiko infinity eyeshadow no 258

September rose slush palette eyeshadow banana

September rose slush palette eyeshadow lemon & lime

Kiko cosmetics smart eyeshadow no 10

September rose slush palette eyeshadow cucumber & lime

Kiko cosmetics automatic precision liner no 708

Kiko cosmetics super color liner no 107

Mac cosmetics loose pigment vanilla

Maybelline sensational lash mascara

Monday, 9 September 2019

Eye makeup look dark plum


Hi fairies,
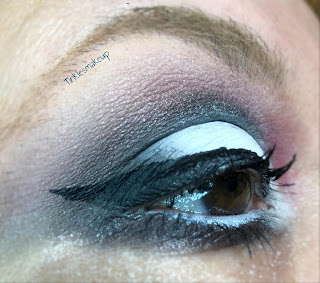
Yesterday evening I had to go to the theatre so I went for a dramatic smokey eye that, in my opinion, was perfect for the occasion. I blended a matte grey on a fluffy brush in the crease because I wanted to create a gradient, and then I applied a black eyeshadow on top of it, being careful not to overlap it completely. I went back with the grey around the edges of the black to soften them.  In the outer corner of my eyes I added a touch of dark plum just to give the look a unique edge. On my lid I used a matte white and I also added some iridescent glitter on top of it. I completed the look with a winged liner and mascara, and that was it, I hope you like it!


eye_makeup_look_dark_plum

eye_makeup_look_dark_plum

eye_makeup_look_dark_plum


Italian version:

Ciao fatine,
Ieri sera dovevo andare a teatro, quindi ho scelto uno smokey eye intense che, secondo me, era perfetto per l’occasione. Nella piega dell’occhio ho sfumato un ombretto opaco grigio con un pennello largo da sfumatura perché volevo creare una gradazione omogenea e, al di sopra, ho applicato un ombretto nero facendo attenzione a non coprire completamente il grigio. Ho ripreso il grigio e l’ho usato sui contorni del nero per renderli meno netti. Nell’angolo esterno dell’occhio ho aggiunto un pizzico di ombretto color prugna scuro per rendere il look più particolare. Sulla palpebra mobile ho applicato un ombretto bianco opaco e ho anche aggiunto dei glitter iridescenti al di sopra. Ho completato il look con una riga di eyeliner e del mascara, ed è tutto, spero vi piaccia!

eye_makeup_look_dark_plum

eye_makeup_look_dark_plum


eye_makeup_look_dark_plum
Products used:

essence cosmetics I love stage eye primer

wycon makeup artist palette no 06

jeffree star cosmetics beauty killer palette star power

jeffree star cosmetics beauty killer palette china white

wycon mono eyeshadow no 01

nyx cosmetics epic ink liner

lancome hypnose doll mascara

Friday, 6 September 2019

Mushrooms/ Funghi nail art


Hi fairies,
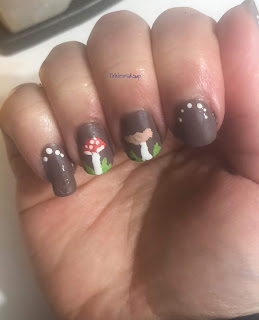
You probably know by now how much I love food or plants themed nail art, so today I decided to feature one of my favorite veggies on my nails, mushrooms! It’s not exactly their season but I find them at the grocery store all year round. I chose a brown background to make mushrooms pop and also because it’s the color of the ground they grow out from and, once it was dry, I painted a cute mushroom on my ring finger and another one with a red hat and white dots on my medium finger, I added some grass strand at the bottom and that was it, I hope you like it!

Mushrooms_nail_art


Mushrooms_nail_art


Italian version:

Ciao fatine,
Ormai penso sappiate quanto mi piacciano le nail art a tema cibo o piante, ed oggi ho deciso di dare spazio a una delle mie verdure preferite, i funghi! Non è esattamente la loro stagione ma li trovo al supermercato tutto l’anno. Ho scelto uno smalto marrone come colore di sfondo per far risaltare i funghi e anche perché è il colore del terreno da cui crescono e, una volta asciutto, ho dipinto un classico fungo sull’anulare e un altro con il cappello rosso a pois bianchi sul medio, ho aggiunto qualche filo d’erba alla base ed è tutto, spero vi piaccia!


Mushrooms_nail_art

Mushrooms_nail_art

Products used:

models own nail polish base coat

kiko nail care fast & dry top coat

kiko power pro nail polish no 27

Americana acrylic paint in white, brown, red, green


Thursday, 5 September 2019

One product review kiko shine refine tonic


Hi fairies,
Today we’ll talk about a tonic I’ve been using for the last month on a daily basis, kiko shine refine tonic. Here’s how it’s described: Sebum-balancing toner. Helps Eliminating impurities and excess oil, cleansing and minimizing the appearance of enlarged pores, moisturizing  and restoring smoothness. 
The product contains salicylic acid and other specific ingredients with their purifying properties. The formula also contains Actiglow, a revolutionary cosmetic technology that enhances the beauty of both the skin and make-up. The lightweight texture applies easily, feels wonderful and leaves you with fresher, smoother skin.  Delicately scented with lily of the valley and cucumber. Ideal for combination to oily skin. Price 8.30 £- 11.90 €.

What I like: I have oily skin so I purchased it because it promises to help purifying and keeping shine at bay; I wasn’t expecting a miracle as it’s just a face tonic but I was pleasantly surprised to find out it does what it say! If used daily it helps keeping sebum under control, my skin looks a bit more glowy and it seems to me it minimizes pores, I’m really happy with it! It’s got a subtle and pleasant cucumber scent, it’s not sticky, it’s very lightweight and there’s no need to rinse it with water. It’s not aggressive, my skin feels soft and hydrated yet deeply clean.

What I don’t like: the only thing I don’t like is the price, it’s a bit expensive even though it lasts really long, but there are other tonics way cheaper that work just as well.

My verdict: I really like it and I’ve already repurchased, it keeps my skin clean and it’s not aggressive on my skin.


Italian version:

Ciao fatine,
Oggi parliamo di un tonico che ho usato quotidianamente nell’ultimo mese,  lo shine refine tonic di Kiko : Tonico seboequilibrante con acido salicilico: rimuove le impurità e l’eccesso di sebo, libera i pori e ne riduce aspetto e dimensione, idrata la pelle e rivela nuova levigatezza. 
L’azione purificante e seboequilibrante è garantita dall’acido salicilico e da attivi specifici e funzionali. La formula contiene, inoltre, l’Actiglow, una rivoluzionaria tecnologia cosmetica in grado di sublimare la bellezza della pelle e, contemporaneamente del make up.La texture è leggera, l’applicazione confortevole per una pelle più fresca e levigata. Delicatamente profumato al mughetto e cetriolo. Adatto alle pelli da miste a oleose. Prezzo 8.30 £- 11.90 €.

Cosa mi piace: ho la pelle grassa quindi l’ho comprato perché promette di aiutare a purificare e a tenere a bada la lucidità; non mi aspettavo miracoli perché si tratta di un semplice tonico viso ma sono stata piacevolmente sorpresa nello scoprire che fa quello che promette! Se usato ogni giorno aiuta a tenere sotto controllo la produzione di sebo, la mia pelle risulta leggermente più luminosa  e mi sembra che minimizzi i pori, mi piace davvero tanto! Ha un delicato e piacevole profumo di cetriolo, non è appiccicoso, è molto leggero e non serve risciacquarlo. Non è aggressivo, la pelle rimane morbida e idratata ma allo stesso tempo pulita a fondo.


Cosa non mi piace: l’unica cosa che non mi piace è il prezzo, è abbastanza costoso anche se una confezione dura a lungo. Però ci sono tonici più economici che fanno il loro dovere.

Il mio verdetto: mi piace e l’ho già ricomprato, pulisce bene la pelle senza essere aggressivo.


Wednesday, 4 September 2019

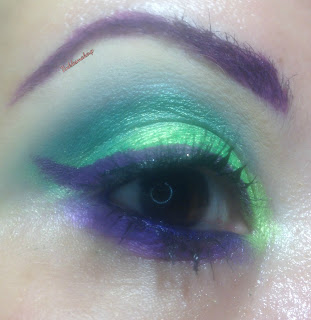
Eye makeup look amanita nightshade - Monster High-


Hi fairies,
This look is inspired by the monster high character Amanita Nightshade, a plant monster born by the seeds of Corpse Flower, an extremely rare flower that blooms every 1300 years.
She thinks very high of herself, she thinks is the most beautiful monster ever, and she wears a dramatic eye makeup that I tried to recreate; first of all I colored my eyebrows with purple, using a mac chromaline, and then I started defining my crease using an emerald green eyeshadow and a blending brush, building the color up till I got the intensity I was looking for. I deepened up the crease with a touch of black eyeshadow just along the lower edge of the crease, and I applied it with a pencil brush that allows me to be more precise. On my lid I place a lighter shade of green , and then I highlighted my browbone area with a matte cream eyeshadow. I completed the look with black eyeliner and mascara and that was it, I hope you like it!

amanita_nightshade_makeup

amanita_nightshade_makeup

amanita_nightshade_makeup


Italian version:

Ciao fatine,
Questo look si ispira al personaggio di Monster High Amanita Nightshade , un mostro vegetale nato dai semi del fiore dei cadaveri, un fiore estremamente raro che fiorisce ogni 1300 anni.
Ha un’alta opinione di se stessa, pensa di essere il più bel mostro di sempre, e il suo trucco occhi è drammatico, ed è quello che ho cercato di riprodurre; prima di tutto ho colorato le sopracciglia di viola usando un mac chromaline, e poi ho iniziato a definire la piega dell’occhio con un ombretto color verde smeraldo e un pennello da sfumatura, intensificando il colore fino ad ottenere la gradazione che volevo. Ho scurito la piega con un pizzico di ombretto nero, applicato solo lungo l’estremità inferiore della piega usando un pennello penna che mi ha permesso di essere precisa. Sulla palpebra mobile ho usato un ombretto di un verde più chiaro, e poi ho illuminato l’arcata sopraccigliare con un ombretto opaco color crema. Ho completato il look con dell’eyeliner nero e del mascara ed è tutto, spero vi piaccia!


Products used:

lime crime eyeshadow brightener

urban decay eyeshadow foxy

dior mono diorshow no 351 feather

coastal scents 88 ultra shimmer palette

kiko long lasting stick eyeshadow no 09

mac chromaline rich purple

kiko smoky eye pencil no 03

kiko overblown mascara


amanita_nightshade_makeup

amanita_nightshade_makeup

amanita_nightshade_makeup

Featured post

World of beauty neroli vivace nuova linea / new line

Hi fairies, I’m very pleased to have the chance to try the new Neroli Vivace line by World of beauty and I’m thrilled to talk about it to...