Hi fairies,
I usually
use more than five eyeshadow for each of my looks, I’ve noticed the more you
practice and you master the blending technique the more colors you add, because
you can clearly see how much of a difference they make: a little bit of this
one in the crease, a little bit of that in the outer corner and so on, for a
seamless result!
Today
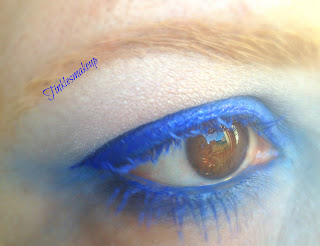
though, I want to show you how to achieve a stunning smoky eye by using just
one color on the lid and the crease and another color as highlighter!
I first
primed my eyes and then I applied a cream colored base to make the eyeshadow
stick and pop; I picked a royal blue pigment and I patted on to my mobile lid,
stopping below my crease: you should apply the eyeshadow stopping below the
spot you want it to reach, because it
will get there once it’s blended; with a blending fluffy brush I started
blending the color upwards, adding it as I went on . the key to achieve a
seamless smoky eye is to be patient and to blend the color very well, to avoid
any harsh lines. You can help the blending by applying a skin tone eyeshadow
around the edges, it will immediately create a nice ombre effect! I didn’t use
any transition color, I just applied a cream eyeshadow with multicolor glitters
in it as highlighter, and I completed the look with a winged liner and mascara!
That’s it, I hope you like it!
Italian version:
Ciao fatine,
Di solito uso più di cinque ombretti per ogni singolo look,
ho notato che più si fa pratica e più si acquisisce padronanza nello sfumare,
più colori si usano, perchè diventa evidente quanta differenza facciano: un
pizzico di quest’ombretto nella piega, un tocco di quell’altro nell’angolo
esterno, e il gioco è fatto, si ottiene un risultato impeccabile!
Oggi tuttavia, voglio mostrarvi come realizzare uno smoky
eye mozzafiato con un solo ombretto sulla palpebra mobile e nella piega e un
altro come illuminante!
Come prima cosa ho applicato una base per ombretti, seguita
da una base colorata in crema che serve per far aggrappare l’ombretto ed
enfatizzarne il colore; ho scelto un blu elettrico e l’ho picchiettato sulla
palpebra mobile, fermandomi al di sotto della piega dell’occhio: dovreste
applicare l’ombretto fermandomi appena sotto al punto in cui volete che arrivi,
perché sarà grazie alla sfumatura che lo porterete fino a quel punto; con un
pennello largo da sfumatura ho poi iniziato a sfumare il colore verso l’alto,
aggiungendo dell’ombretto man mano che andavo avanti. La chiave per ottenere
uno smoky eye dalla sfumatura omogenea è quella di essere pazienti e di sfumare
molto bene, per eliminare righe nette. Potete aiutarvi applicando un ombretto
color carne intorno ai bordi dell’ombretto , vedrete che andrà a creare subito
una gradazione senza stacchi! Non ho usato un colore di transizione, ho solo
applicato un illuminante color crema con micro glitter colorati,e ho completato il look con una linea di
eyeliner e del mascara, ed è tutto, spero vi piaccia!
Products
used:
benefit eye
primer stay don’t stray!
Kiko long
lasting stick eyeshadow nr 31
Cinecittà
mono eyeshadow nr 52
Wet n wild
boardwalk boozing palette
Sugarpill
loose pigment in royal sugar
Kiko
infinity eyeshadow nr 277
Kiko
infinity eyeshadow nr 279
Fyrinnae
loose pigment in nijiiro
Kiko kajal
kohl pencil nr 109
Kiko super
colour liner nr 107


Splendido anche questo make-up, bravissima!
ReplyDeleteAlessia
THECHILICOOL
FACEBOOK
Kiss
grazie :)
Deleteit looks lovely!
ReplyDeletethank you!
Deleteit reminds me of ice queen makeup
ReplyDeleteit does, doesn't it? i love it!
Deletel love it, blue is one of my favorite colors!
ReplyDeletesame here, I love it!
Deleteit's all a matter of blending, I love how it turned out :)
ReplyDeletethank you , I'm happy you like it !
DeleteBellissimo,adoro il blu <3
ReplyDeletegrazie, anche a me piace molto :)
Delete