Thursday 28 September 2017

rainy day/un giorno di pioggia nail art

Hi fairies,
I can’t wait for fall to start, I actually love gloomy weather and rain, I’m weird, I know! For this nail art I chose a light grey as background color to represent a cloudy sky, and then with a dotting tool and two shades of blue I painted dots of different sizes on my index, middle and pinky finger, concentrating most of them at the tips, while at the top I painted a cloud. On my ring finger I painted an umbrella and on my thumb I painted a rainbow coming out of a cloud, and that was it, I hope you like it!

rainy_day_nail_art


rainy_day_nail_art

Italian version:

Ciao fatine,
Non vedo l’ora che inizi l’autunno, amo il tempo uggioso e la pioggia, lo so, sono strana! Per questa nail art ho scelto un color grigio chiaro come sfondo per rappresentare il cielo nuvoloso, e poi con un dotting tool e due diverse tonalità di blu ho disegnato dei pois di misure diverse sull’indice, sul medio e sul mignolo, concentrandone la maggior parte sulla punta, mentre nella parte alta ho disegnato una nuvola. Sull’anulare ho disegnato un ombrello, e sul pollice, invece, un arcobaleno che spunta da una nuvola, ed è tutto, spero vi piaccia!

rainy_day_nail_art
rainy_day_nail_art

Products used:

kiko nail care 3 in 1 shine fortifying base and top coat

kiko smart nail polish no 76

kiko nail polish no 330

kiko quick dry nail polish no 850

kiko power pro nail polish no 101

nubar nail lacquer no 137 silver mist

kiko cupcake nail lacquer no 650


americana acrylic paint in black, red, green, yellow

Wednesday 27 September 2017

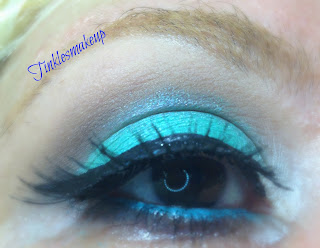
Eye makeup look smokey turquoise

Hi fairies,
Summer is almost over but there’s still time for my favorite shades and a mermaid look! For this makeup I started applying a shimmery aqua eyeshadow on my lid leaving out the outer corner and not going up towards my crease; in my outer corner I used a matte charcoal eyeshadow  and I shaped it with the help of a precision brush; I also blended where the two colors met, and I softened the edges in my crease. I suggest to use tape in the outer corner to get a very sharp line. In my crease I added a caramel eyeshadow and I blended it very well. I used a matte cream as my browbone highlighter, and I completed the look with a winged liner and mascara, as you can see it’s easy to do, just few steps, and the result is gorgeous, I hope you like it!

eye_makeup_look_smokey_turquoise

eye_makeup_look_smokey_turquoise

eye_makeup_look_smokey_turquoise


Italian version:

Ciao fatine,
L’estate è quasi finita ma c’è ancora tempo per usare I miei colori preferiti e per un look da sirena! Per questo makeup ho iniziato applicando un ombretto verde acqua dal finish luminoso sulla palpebra mobile, lasciando libero l’angolo esterno e non portandolo nella piega dell’occhio; nell’angolo esterno ho usato un ombretto opaco grigio scuro e mi sono aiutata con un pennello di precisione per dare la forma alla codina; ho anche sfumato il punto in cui i due colori si incontravano, e ho sfumato i contorni nella piega. Consiglio di usare del nastro adesivo nell’angolo esterno per ottenere una linea molto netta. Nella piega ho aggiunto un ombretto color caramello e l’ho ben sfumato. Ho scelto un ombretto opaco color crema come illuminante dell’arcata sopraccigliare, e ho completato il look con una riga di eyeliner e del mascara, come vedete è un makeup semplice da realizzare, sono solo pochi passaggi, ma il risultato è particolare, spero vi piaccia!


eye_makeup_look_smokey_turquoise

eye_makeup_look_smokey_turquoise

eye_makeup_look_smokey_turquoise

Products used:

nyx cosmetics white eyeshadow base

kiko night sky palette no 02 light to neutral

kiko infinity eyeshadow no 265

urban decay eyeshadow in faint

urban decay eyeshadow in naked 2

urban decay eyeshadow in foxy

urban decay eyeshadow in w.o.s.

kiko smart eye pencil no 813

urban decay 24/7 waterproof liquid liner in perversion


kiko overblown mascara

Tuesday 26 September 2017

Octopus/polipo nail art

Hi fairies,
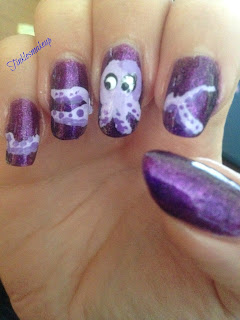
It’s still summer and walking on the beach or going sailing is very nice as it’s not very hot as it was in august, so a sea life nail art is still cute and fitting in my opinion! This one has an octopus as main character, it’s easy and funny: I painted all my nails with a purple nail polish topped with a blue glitter nail polish to give the illusion of a sparkly sea, and then I started painting the octopus. I decided to paint its head on my middle finger and another one on my thumb using purple, and I just shaped an oval to create the shape, I added the top of tentacles at the bottom of the head and eyes at the top;  on the other nails I painted its tentacles using two purple shades to give more dimension to my drawing and I also added some dots, and that was basically it, I hope you like it!


octopus_nail_Art

Italian version:

Ciao fatine,
Siamo ancora in estate ed è piacevole fare una passeggiata sulla spiaggia o fare una gita in barca visto che non fa così caldo come in agosto, e quindi ho pensato che una nail art a tema marino sarebbe stata simpatica e appropriata! Questa ha come protagonista un polipo, è facile e divertente: ho usato uno smalto celeste chiaro a cui ho aggiunto una passata di smalto viola con glitter su tutte le unghie per riprodurre il mare con i suoi riflessi, e poi ho cominciato a disegnare il polipo. Ho deciso di dipingere la testa sul medio e un’altra sul pollice usando il viola, e gli ho semplicemente dato una forma ovale, ho poi aggiunto una parte dei tentacoli nella parte bassa della testa e gli occhi nella parte alta; sulle altre unghie ho disegnato i tentacoli usando due tonalità di viola per dargli più profondità al disegno, e ho aggiunto anche dei pallini, ed è praticamente tutto, spero vi piaccia!

octopus_nail_Art
Products used:

kiko nail care 3 in 1 fortifying base and top coat

kiko nail polish no 278


Americana acrylic paint in purple, red, white, black

octopus_nail_Art

Monday 25 September 2017

Eye makeup look sparkly mermaid

Hi fairies,
You know how much I love aqua shades, especially in summer, so today my makeup revolves around those shades and it looks just awesome! These colors complement my skin tone really well but I know they don’t look good with every skin tone and many people don’t like them, in this case you can use peach shades for example, and try to recreate a similar look!
I first applied a light peach shade in my crease as my transition color and I blended it very well, and then I used an aqua shade all over my lids; in my outer corner I used a teal eyeshadow and I blended the edges into the aqua with swiping motions. I added a blue in the outer corner and I used a pencil brush to pack the color exactly when I wanted to. I also blended a tiny bit of a light blue in the crease to put everything together, and I used a cream matte eyeshadow as my browbone highlighter. I patted a tiny bit of teal glitter in the middle of my lid, and I completed the look with a winged liner and mascara, I hope you like it!

eye_makeup_look_sparkly_mermaid

eye_makeup_look_sparkly_mermaid

eye_makeup_look_sparkly_mermaid


Italian version:

Ciao fatine,
Sapete quanto io ami le tonalità verde acqua, specialmente in estate, infatti il trucco di oggi ha come protagonisti proprio questi colori, e il risultato mi soddisfa molto! Queste tonalità stanno bene con la mia carnagione, ma so che, con alcune carnagioni, non stanno bene e che non piacciono a molti, in questo caso potreste, ad esempio, usare dei toni sul pesca per realizzare un trucco simile!
Come prima cosa ho usato un color pesca chiaro come colore di transizione e l’ho sfumato molto bene, e poi ho applicato un ombretto verde acqua sulla palpebra mobile; nell’angolo esterno ho usato un ombretto azzurro e ho sfumato bene i bordi nel verde acqua con movimenti orizzontali. Ho aggiunto un ombretto blu nell’angolo esterno, usando un pennello penna per l’applicazione, in modo da poter concentrare il colore esattamente dove volevo. Ho anche aggiunto un color celeste chiaro nella piega per rendere il trucco uniforme, e ho usato un ombretto opaco color crema come illuminante sotto l’arcata sopraccigliare. Ho picchiettato un po’ di glitter azzurri al centro della palpebra mobile, e ho completato il look con una riga di eyeliner e del mascara, spero vi piaccia!

eye_makeup_look_sparkly_mermaid

eye_makeup_look_sparkly_mermaid

eye_makeup_look_sparkly_mermaid

Products used:

nyx cosmetics white eyeshadow base

the balm meet Matt(e ) palette Matt Singh

the balm meet Matt(e ) palette Matt Lombardi

the balm meet Matt(e ) palette Matt Malloy

sugarpill cosmetics sparkle baby palette candy crush

kiko infinity eyeshadow no 277

kiko infinity eyeshadow no 278

kiko smart eye pencil no 813

kiko super color liquid liner no 106

Sephora eye glittering duo no 07 iridescent

Kiko overblown mascara


Saturday 23 September 2017

Love letters nail art

Hi fairies,
This nail art is easy and I like how it looks, it could also be a base for any nail art, for example you could add flowers or stars or dots! I chose a baby blue nail polish as a background and, when it was dry, I drew some waves with black and a small detail nail art brush without following any patterns, I randomly placed them on the surface of my nails. I outlined the waves with white and that was it, I hope you like it!

love_letters_nail_art

Italian version:

Ciao fatine,
Questa nail art è abbastanza semplice e mi piace l’effetto, potrebbe anche essere la base per qualsiasi altra nail art, ad esempio si potrebbero aggiungere fiori, stelle o pois! Ho scelto uno smalto celeste pallido come sfondo e, quando si è asciugato, ho disegnato alcune onde con del nero e un pennello sottile da nail art, senza seguire uno schema preciso, semplicemente posizionandole su tutta la superficie delle unghie. Ho poi sottolineato le onde ripassandole con del bianco, ed è tutto, spero vi piaccia!

love_letters_nail_art

Products used:

kiko nail care 3 in 1 shine fortifying base and top coat

wet n wild megalast nail polish no 34523 tree hugger


Americana acrylic paint in black and white

love_letters_nail_art

Friday 22 September 2017

Eye makeup look romantic pink

Hi fairies,
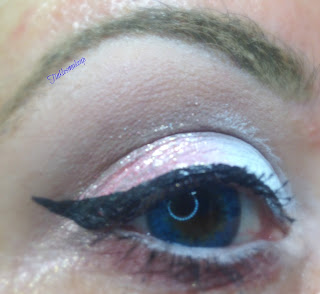
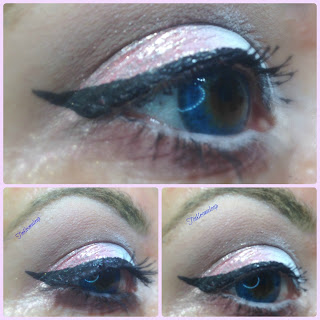
I feel romantic today so I’ve decided to go for a girly and romantic eye makeup, which is quite neutral and simple! I’ve started by giving depth to my crease and, to do that, I first applied a light matte taupe eyeshadow with a blending brush, just as a base, and on top of that I applied a slightly darker hazelnut eyeshadow. At this point I don’t mind if I go on my lid too, because I will define my crease later with concealer: it’s a great way to cut your crease and to achieve a sharp and neat eyeshadow result!
I did that and then I picked a duochrome white/pink eyeshadow and I applied in the inner half of my lid, while on the outer half I placed a shimmery pink peach eyeshadow. I used a matte beige as my browbone highlighter, and I completed the look with a winged liner and mascara, and that was it, I hope you like it!

eye_makeup_look_romantic_pink

eye_makeup_look_romantic_pink

eye_makeup_look_romantic_pink

Italian version:

Ciao fatine,
Oggi mi sento romantica così ho deciso di optare per un trucco occhi femminile e romantico, piuttosto semplice e neutro! Ho iniziato dando profondità alla piega dell’occhio e, per farlo, prima ho applicato un ombretto opaco color tortora chiaro con un pennello da sfumatura, che funge da base, e al di sopra ho applicato un ombretto color nocciola leggermente più scuro. A questo punto non mi importa di andare anche sulla palpebra, perché successivamente definirò la piega con del correttore: questo è un modo veloce di definire la piega e di ottenere un risultato definito e preciso!
Dopo aver fatto questa operazione, ho scelto un ombretto cangiante bianco/rosa e l’ho applicato nella metà interna della palpebra mobile, mentre nella metà esterna ho usato un ombretto luminoso color rosa pesca. Come illuminante dell’arcata sopraccigliare ho usato un ombretto opaco beige, e ho terminato il look con una riga di eyeliner e del mascara, ed è tutto, spero vi piaccia!

eye_makeup_look_romantic_pink

eye_makeup_look_romantic_pink

eye_makeup_look_romantic_pink

Products used:

nyx cosmetics white eyeshadow base

urban decay eyeshadow in faint

urban decay eyeshadow in foxy

urban decay eyeshadow in naked 2

urban decay eyeshadow in limit

urban decay eyeshadow in strange

zoeva retrofuture palette galaxy

colourpop super shock shadow just fur fun

kiko cosmetics kajal kohl pencil no 101

urban decay 24/7 waterproof liquid liner in perversion


kiko overblown mascara

Wednesday 20 September 2017

My tattoos/ I miei tatuaggi

Hi fairies,
today I want to talk about another one of my passion, tattoos! I’ve been wanting a tattoo since I was a child and I didn’t even know how they were done,all I knew was I wanted one! They weren’t popular like they are now and when I told my parents they replied : “Only sailors and people in jail got one!” because that was how it was. My parents have always been very open minded but tattoos weren’t trendy , that’s why they were against it. Luckily things changed in the following years, so getting a tattoo wasn’t an issue anymore.
To me tattoos are a form of art and a way to express myself, they are also a way to show people a bit more of my personality and of who I am without needing to talk. It’s not the same for everybody, there are several reasons why people get a tattoo and they’re all legit as it’s our body and we can do whatever we like with it. I currently have 8 tattoos and I’m planning to get at least three more, and then we’ll see, I might get a half leg sleeve, who knows!
If you want a tattoo the first thing to check is you’re choosing a licensed tattoo studio because since tattoos have become a trend there have been so many unprofessional tattooists trying to make money , and health risks have become a serious issue. Here’s few tips :
 It’s crucial to choose a tattooist who uses single use kits and hold disposable needles and tubes. Watch them unseal the envelope before starting your tattoo.
Make sure they’re wearing disposable gloves and watch your tattooist wear them before starting tattooing you.
Make sure they clean the surface you’re lying on before starting.
Make sure the studio looks clean and the artist looks clean.


MY TATTOOS:
My first tattoo was a tribal and it’s on my tummy to the left of my belly button. It really doesn’t have a meaning, I chose it because I wanted something small and I liked the shape. It’s almost 20 years old and it still looks good.
my_tattoos_i_miei_tatuaggi

I got a seahorse tribal style on the back of my neck, it’s a tiny tattoo and I’m still pleased with it even though I can’t see it unless I take a pic, and that’s something that bothers me: I don’t think I will ever tattoo my back because I like to look at my tattoos.

my_tattoos_i_miei_tatuaggi

Then there’s a phoenix on my wrist which needs to be touched up but I haven’t decided whether to do it or not, I might cover it up with another phoenix. The phoenix is a symbol of rebirth and I chose it to mark the end of a difficult time in my life.
my_tattoos_i_miei_tatuaggi


The one on my foot  has got a very private meaning and I’m thinking of covering it up , I’ll do it sooner or later.
my_tattoos_i_miei_tatuaggi

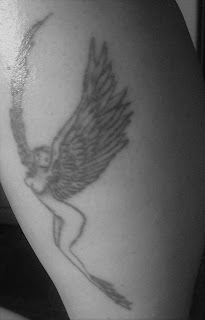
I love fairies and magic, that’s why I have one on my calf, this is currently the biggest tattoo I have and if I could choose now I would still get a fairy but a different one. The thing is, when I got this tattoo I had to choose from some drawings and I couldn’t ask for a customized drawing so I ended up with this one even though it wasn’t exactly what I wanted. But I love fairies as a subject!
All these tattoos, apart from the first one, were done at Tribal Tattoo Studio, one of the most famous and well known studio in Rome. Marco Manzo, the owner , is one of the best Italian tattooist, he now focuses on mandala designs.
my_tattoos_i_miei_tatuaggi

I got one after my father passed away last year, this is his heartbeat and I picked his nickname with the infinite symbol, which is a bit cheesy I know, but in this case it was very fitting. I’m really happy to have a memorial tattoo for him as he was and will always be the most important man in my life.

my_tattoos_i_miei_tatuaggi

My last tattoo is the one I love the most (obviously), it’s a tinkerbell’s portrait and I added a quote saying “Imagination is the only weapon in the war against reality”. That says a lot about me , I’m a day dreamer and I love magic, I love fairy tales and I love living in my own world. This tattoo was done at BlackDragon Tattoo studio by Giordano Vignati (ig: https://www.instagram.com/giordano_vignati_tattoo/ ), who I appreciate really much, he’s very talented, humble and professional, I highly recommend him!

my_tattoos_i_miei_tatuaggi

How do I take care of my tattoos? Taking care of your tattoo will prevent infections and the result will be perfect, so make sure to follow these simple steps:  as soon as I get home I wash it with warm water and neutral soap, I dry it patting on rather than rubbing my towel because skin is irritated and you need to be gentle. I use bepanthenol to keep it hydrated and protected instead of the old petroleum jelly, which I used for my first tattoo, it worked well though so you can if you want. You can also use shea butter if you want to go for a more natural option. If it’s in a place that gets in touch with clothes I put bandage on else I don’t, I apply cream twice or three times a day, if it itches I put some cream on.

I think I’ve told you everything I wanted to, let me know if you have any tattoos , tell me your experience and tell me if you’re planning to get one!

Italian version:

Ciao fatine,
Oggi voglio parlarvi di un’altra mia passione, i tatuaggi! Sin da quando ero bambina volevo farmi un tatuaggio, nonostante non sapessi nemmeno come venivano fatti,sapevo, però, che ne volevo uno! All’epoca non erano così diffusi come lo sono adesso e, quando lo dissi ai miei genitori, loro risposero: “solo i marinai e i carcerati si tatuano!” perché era effettivamente così. I miei genitori sono sempre stati molto aperti ma i tatuaggi non erano una moda, ecco perché erano contrari. Fortunatamente da lì a poco le cose cambiarono, e farmi un tatuaggio non è stato motivo di scontro.
Per me i tatuaggi sono una forma d’arte e un modo di esprimere me stessa, sono anche un modo di mostrare un po’ più della mia personalità senza bisogno di parole. Ci sono tanti motivi per farsi tatuare, non sono gli stessi per tutti ma sono tutti ugualmente validi perché il corpo è nostro e possiamo farci quello che vogliamo. Al momento ho 8 tatuaggi e ne ho in progetto altri tre, poi vedremo, potrei fare una half sleeve sulla gamba, chissà!
Se volete farvi un tatuaggio la prima cosa da verificare è che lo studio a cui vi rivolgete sia di professionisti seri e, possibilmente, riconosciuti perché, da quando si è diffusa la moda, sono spuntati tanti tatuatori improvvisati che vogliono solo fare soldi a discapito dell’igiene e della salute, che vengono messe seriamente a rischio.
Ecco qualche consiglio:
è fondamentale scegliere un tatuatore che usi kit monouso con aghi e tubi usa e getta. Chiedete che le buste sigillate vengano aperte davanti ai vostri occhi prima di iniziare la sessione.
Assicuratevi che il tatuatore usi guanti usa e getta e che li indossi in vostra presenza.
Assicuratevi che pulisca tutte le superfici su cui vi sdraierete.
Assicuratevi che lo studio, e il tatuatore, abbia un aspetto pulito e curato.


I MIEI TATUAGGI:

il mio primo tatuaggio è un tribale che ho sulla pancia, alla sinistra dell’ombelico, e non ha nessun significato particolare, l’ho scelto perché mi piaceva la forma e la dimensione. Ormai ha quasi 20 anni e si è mantenuto bene.

my_tattoos_i_miei_tatuaggi

Ho un cavalluccio marino sempre in stile tribale sul retro del collo, è piccolo e ancora mi piace anche se non riesco a vederlo a meno che non gli faccia una foto, e questa è una cosa che un po’ mi infastidisce: non credo che mi tatuerò mai la schiena perché mi piace poter vedere i miei tatuaggi.
my_tattoos_i_miei_tatuaggi

Poi ho una fenice sul polso che dovrei ribattere, ma non ho ancora deciso se farlo o meno, potrei anche coprirlo con un’altra fenice. La fenice simboleggia la rinascita, e questo tatuaggio ha segnato la fine di un periodo difficile della mia vita.
my_tattoos_i_miei_tatuaggi

Quello che ho sul piede ha un significato che preferisco tenere privato, ma sto pensando di coprirlo e credo che prima o poi lo farò.
my_tattoos_i_miei_tatuaggi

Amo le fatine e la magia, ecco perché ne ho tatuata una sul polpaccio che è, attualmente il tatuaggio più grande che ho e, se potessi scegliere adesso, sceglierei sempre una fatina ma disegnata in modo diverso. Purtroppo quando l’ho fatto ho dovuto scegliere tra un catalogo di disegni già fatti, non ho potuto chiedere di personalizzarlo, quindi alla fine scelsi questo anche se non era esattamente quello che avevo in mente. Ma adoro i tatuaggi di fate!
my_tattoos_i_miei_tatuaggi

Tutti questi tatuaggi, tranne il primo, sono stati eseguiti presso il Tribal Tattoo Studio, uno degli studi più conosciuti e famosi di Roma. Il proprietario, Marco Manzo, è uno dei migliori tatuatori italiani, e ora è specializzato nei mandala.

Subito dopo la morte di mio padre, lo scorso anno, ho fatto questo tatuaggio con il suo battito cardiaco e il suo soprannome e il simbolo dell’infinito che, lo so, è un po’ scontato e stravisto ma, in questo caso, era perfetto. Sono molto contenta di aver fatto un tatuaggio in sua memoria, è stato e sarà sempre l’uomo più importante della mia vita.

my_tattoos_i_miei_tatuaggi

L’ultimo tatuaggio è quello che, ovviamente, amo di più! Si tratta di tinkerbell e io ho aggiunto una citazione che dice ““Imagination is the only weapon in the war against reality”. (l’immaginazione è l’unica arma nella guerra contro la realtà). Dice molto di me, infatti sono una sognatrice, amo la magia, le favole, e vivere in un mondo tutto mio. Questo tatuaggio l’ho fatto al Black Dragon Tattoo studio e il tatuatore è Giordano Vignati, (ig: https://www.instagram.com/giordano_vignati_tattoo/ ) un ragazzo che stimo molto, è bravissimo, umile e molto professionale, ve lo consiglio!

my_tattoos_i_miei_tatuaggi

Come mi prendo cura dei miei tatuaggi? La cura del tatuaggio è fondamentale per evitare infezioni e per ottenere un risultato perfetto, quindi è fondamentale seguire questi semplici passi: io appena tornata a casa lo lavo con acqua tiepida e sapone neutro e poi, per asciugarlo, lo tampono invece che strofinarlo con l’asciugamano perché la pelle è irritata ed è meglio fare attenzione. Per mantenerlo idratato e protetto uso il bepanthenol invece della vecchia cara vaselina, che ho usato per il primo tatuaggio e comunque funziona, se preferite potete optare per lei. Se invece volete un’alternativa più naturale potete usare il burro di karitè. Se si trova in un punto che è a contatto con i vestiti lo copro con una garza, altrimenti lo lascio scoperto e applico la crema due o tre volte al giorno, se lo sento prudere o tirare applico la crema.

Penso di avervi detto tutto, fatemi sapere se avete tatuaggi, qual è la vostra esperienza e se state pensando di farne uno!

Tuesday 19 September 2017

Eye makeup look clouds/nuvole

Hi fairies,
I’ve been inspired by a sunny sky and all its shades for this look, so this is a colourful and bright look not easy to wear but really fun and beautiful in my opinion!
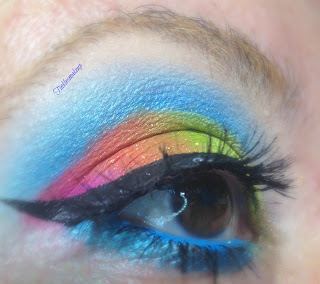
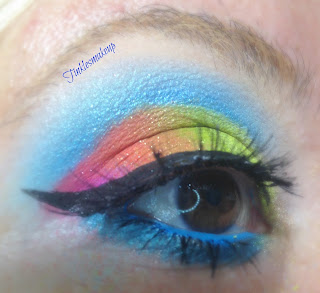
I started by cutting my crease with a detail brush and royal blue eyeshadow just following the natural shape of my crease; I brought the color up just a tiny bit, to defuse any harsh lines, and then I added a sky blue to create a gradient. I carved the cut crease with concealer, I love this “trick” because I can fix any mistakes and get a sharp line in my crease with basically no effort! On my lid I applied a lime green in the outer corner, a yellow in the middle and an orange in the outer corner and I blended each color into the next one really well. In my lower lashline I used a purple eyeshadow, and I completed the look with a winged liner and mascara, and that was it, I hope you like it!

eye_makeup_look_clouds

eye_makeup_look_clouds

eye_makeup_look_clouds


Italian version:

Ciao fatine,
Per questo look mi sono ispirata a un cielo sereno con tutte le sue tonalità, quindi questo è un look colorato e intenso non facile da portare, ma molto bello e divertente secondo me!
Ho iniziato a definire la piega dell’occhio con un pennello sottile e dell’ombretto blu elettrico semplicemente seguendo la forma naturale del mio occhio; ho portato il colore verso l’alto solo un po’, per eliminare righe nette, e poi ho aggiunto un turchese per creare una sfumatura omogenea. Ho poi scolpito la piega con del correttore, e questo è un trucchetto che amo perché riesco a correggere qualsiasi errore e ad ottenere una riga molto definita praticamente senza sforzo! Sulla palpebra mobile ho usato un verde acido nell’angolo interno, un giallo al centro e un arancione nell’angolo esterno, e ho sfumato bene ogni colore nel successivo. Nella palpebra inferiore ho usato un ombretto viola, e ho completato il look con una riga di eyeliner e del mascara, ed è tutto, spero vi piaccia!

eye_makeup_look_clouds

eye_makeup_look_clouds

eye_makeup_look_clouds

Products used:

nyx cosmetics white eyeshadow base

urban decay pressed pigment in gonzo

about face loose pigment in electric lust

urban decay pressed pigment in savage

urban decay pressed pigment in slowburn

urban decay pressed pigment in thrash

urban decay pressed pigment in fringe

urban decay eyeshadow in foxy

colourpop super shock shadow in glowstix


kiko kajal kohl pencil no 111

Featured post

World of beauty neroli vivace nuova linea / new line

Hi fairies, I’m very pleased to have the chance to try the new Neroli Vivace line by World of beauty and I’m thrilled to talk about it to...